VPC and Cloud Computing
What is a virtual private cloud (VPC)?
A VPC is a public cloud offering that lets an enterprise establish its own private cloud-like computing environment on shared public cloud infrastructure. A VPC gives an enterprise the ability to define and control a virtual network that is logically isolated from all other public cloud tenants, creating a private, secure place on the public cloud.
A VPC’s logical isolation is implemented using virtual network functions and security features that give an enterprise customer granular control over which IP addresses or applications can access particular resources.
Architecture
In a VPC, you can deploy cloud resources into your own isolated virtual network. These cloud resources—also known as logical instances—fall into three categories.
-
Compute: Virtual server instances (VSIs, also known as virtual servers) are presented to the user as virtual CPUs (vCPUs) with a predetermined amount of computing power, memory, etc.
-
Storage: VPC customers are typically allocated a certain block storage quota per account, with the ability to purchase more. It is akin to purchasing additional hard drive space. Recommendations for storage are based on the nature of your workload.
-
Networking: You can deploy virtual versions of various networking functions into your virtual private cloud account to enable or restrict access to its resources. These include public gateways, which are deployed so that all or some areas of your VPC environment can be made available on the public-facing Internet; load balancers, which distribute traffic across multiple VSIs to optimize availability and performance; and routers, which direct traffic and enable communication between network segments. Direct or dedicated links enable rapid and secure communications between your on-premises enterprise IT environment or your private cloud and your VPC resources on public cloud.
Three-tier architecture in a VPC
The majority of today’s applications are designed with a three-tier architecture comprised of the following interconnected tiers:
-
The web or presentation tier, which takes requests from web browsers and presents information created by, or stored within, the other layers to end users.
-
The application tier, which houses the business logic and is where most processing takes place.
-
The database tier, comprised of database servers that store the data processed in the application tier.
To create a three-tier application architecture on a VPC, you assign each tier its own subnet, which will give it its own IP address range. Each layer is automatically assigned its own unique ACL.
Security
VPCs achieve high levels of security by creating virtualized replicas of the security features used to control access to resources housed in traditional data centers. These security features enable customers to define virtual networks in logically isolated parts of the public cloud and control which IP addresses have access to which resources.
Two types of network access controls comprise the layers of VPC security:
-
Access control lists (ACLs): An ACL is a list of rules that limit who can access a particular subnet within your VPC. A subnet is a portion or subdivision of your VPC; the ACL defines the set of IP addresses or applications granted access to it.
-
Security group: With a security group, you can create groups of resources (which may be situated in more than one subnet) and assign uniform access rules to them. For example, if you have three applications in three different subnets, and you want them all to be public Internet-facing, you can place them in the same security group. Security groups act like virtual firewalls, controlling the flow of traffic to your virtual servers, no matter which subnet they are in.
VPCs on AWS Cloud
VPC and subnet basics
A virtual private cloud (VPC) is a virtual network dedicated to your AWS account. It is logically isolated from other virtual networks in the AWS Cloud. You can launch your AWS resources, such as Amazon EC2 instances, into your VPC.
When you create a VPC, you must specify a range of IPv4 addresses for the VPC in the form of a Classless Inter-Domain Routing (CIDR) block; for example, 10.0.0.0/16. This is the primary CIDR block for your VPC.
A VPC spans all of the Availability Zones in the Region. The following diagram shows a new VPC with an IPv4 CIDR block.
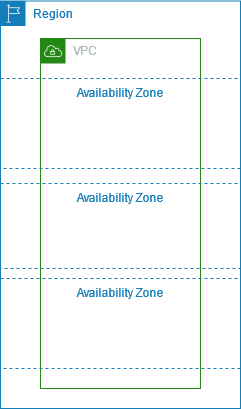
After you create a VPC, you can add one or more subnets in each Availability Zone. A subnet is a range of IP addresses in your VPC. You can launch AWS resources, such as EC2 instances, into a specific subnet. When you create a subnet, you specify the IPv4 CIDR block for the subnet, which is a subset of the VPC CIDR block. Each subnet must reside entirely within one Availability Zone and cannot span zones. By launching instances in separate Availability Zones, you can protect your applications from the failure of a single zone.
You can also optionally assign an IPv6 CIDR block to your VPC, and assign IPv6 CIDR blocks to your subnets.
The following diagram shows a VPC that has been configured with subnets in multiple Availability Zones. 1A, 2A, and 3A are instances in your VPC. An IPv6 CIDR block is associated with the VPC, and an IPv6 CIDR block is associated with subnet 1. An internet gateway enables communication over the internet, and a virtual private network (VPN) connection enables communication with your corporate network.
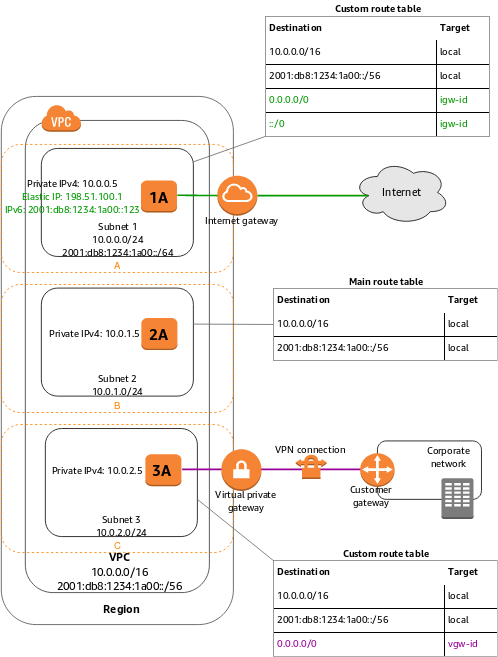
If a subnet’s traffic is routed to an internet gateway, the subnet is known as a public subnet. In this diagram, subnet 1 is a public subnet. If you want your instance in a public subnet to communicate with the internet over IPv4, it must have a public IPv4 address or an Elastic IP address (IPv4). For more information about public IPv4 addresses, see Public IPv4 addresses. If you want your instance in the public subnet to communicate with the internet over IPv6, it must have an IPv6 address.
If a subnet doesn’t have a route to the internet gateway, the subnet is known as a private subnet. In this diagram, subnet 2 is a private subnet.
If a subnet doesn’t have a route to the internet gateway, but has its traffic routed to a virtual private gateway for a Site-to-Site VPN connection, the subnet is known as a VPN-only subnet. In this diagram, subnet 3 is a VPN-only subnet. Currently, we do not support IPv6 traffic over a Site-to-Site VPN connection.
Subnet routing
Each subnet must be associated with a route table, which specifies the allowed routes for outbound traffic leaving the subnet. Every subnet that you create is automatically associated with the main route table for the VPC. You can change the association, and you can change the contents of the main route table.
In the previous diagram, the route table associated with subnet 1 routes all IPv4 traffic (0.0.0.0/0) and IPv6 traffic (::/0) to an internet gateway (for example, igw-1a2b3c4d). Because instance 1A has an IPv4 Elastic IP address and an IPv6 address, it can be reached from the internet over both IPv4 and IPv6.
Note
The instance 2A can’t reach the internet, but can reach other instances in the VPC. You can allow an instance in your VPC to initiate outbound connections to the internet over IPv4 but prevent unsolicited inbound connections from the internet using a network address translation (NAT) gateway or instance. Because you can allocate a limited number of Elastic IP addresses, we recommend that you use a NAT device if you have more instances that require a static public IP address. To initiate outbound-only communication to the internet over IPv6, you can use an egress-only internet gateway.
The route table associated with subnet 3 routes all IPv4 traffic (0.0.0.0/0) to a virtual private gateway (for example, vgw-1a2b3c4d). Instance 3A can reach computers in the corporate network over the Site-to-Site VPN connection.
Subnet security
AWS provides two features that you can use to increase security in your VPC: security groups and network ACLs. Security groups control inbound and outbound traffic for your instances, and network ACLs control inbound and outbound traffic for your subnets. In most cases, security groups can meet your needs; however, you can also use network ACLs if you want an additional layer of security for your VPC.
Route tables
A route table contains a set of rules, called routes, that are used to determine where network traffic from your subnet or gateway is directed.
Route table concepts
The following are the key concepts for route tables.
-
Main route table—The route table that automatically comes with your VPC. It controls the routing for all subnets that are not explicitly associated with any other route table.
-
Custom route table—A route table that you create for your VPC.
-
Edge association—A route table that you use to route inbound VPC traffic to an appliance. You associate a route table with the internet gateway or virtual private gateway, and specify the network interface of your appliance as the target for VPC traffic.
-
Route table association—The association between a route table and a subnet, internet gateway, or virtual private gateway.
-
Subnet route table—A route table that’s associated with a subnet.
-
Gateway route table*—A route table that’s associated with an internet gateway or virtual private gateway.
-
Local gateway route table—A route table that’s associated with an Outposts local gateway.
-
Destination—The range of IP addresses where you want traffic to go (destination CIDR). For example, an external corporate network with the CIDR 172.16.0.0/12.
-
Propagation—Route propagation allows a virtual private gateway to automatically propagate routes to the route tables. This means that you don’t need to manually enter VPN routes to your route tables. For more information about VPN routing options, see Site-to-Site VPN routing options in the Site-to-Site VPN User Guide.
-
Target—The gateway, network interface, or connection through which to send the destination traffic; for example, an internet gateway.
-
Local route—A default route for communication within the VPC.
How route tables work
Your VPC has an implicit router, and you use route tables to control where network traffic is directed. Each subnet in your VPC must be associated with a route table, which controls the routing for the subnet (subnet route table). You can explicitly associate a subnet with a particular route table. Otherwise, the subnet is implicitly associated with the main route table. A subnet can only be associated with one route table at a time, but you can associate multiple subnets with the same subnet route table.
You can optionally associate a route table with an internet gateway or a virtual private gateway (gateway route table). This enables you to specify routing rules for inbound traffic that enters your VPC through the gateway.
Routes
Each route in a table specifies a destination and a target. For example, to enable your subnet to access the internet through an internet gateway, add the following route to your subnet route table. The destination for the route is 0.0.0.0/0, which represents all IPv4 addresses. The target is the internet gateway that’s attached to your VPC.
| Destination | Target |
|---|---|
0.0.0.0/0 |
igw-id |
CIDR blocks for IPv4 and IPv6 are treated separately. For example, a route with a destination CIDR of 0.0.0.0/0 does not automatically include all IPv6 addresses. You must create a route with a destination CIDR of ::/0 for all IPv6 addresses.
Every route table contains a local route for communication within the VPC. This route is added by default to all route tables. If your VPC has more than one IPv4 CIDR block, your route tables contain a local route for each IPv4 CIDR block. If you’ve associated an IPv6 CIDR block with your VPC, your route tables contain a local route for the IPv6 CIDR block. You cannot modify or delete these routes in a subnet route table or in the main route table.
You can add a route to your route tables that is more specific than the local route. The destination must match the entire IPv4 or IPv6 CIDR block of a subnet in your VPC.
If your route table has multiple routes, we use the most specific route that matches the traffic (longest prefix match) to determine how to route the traffic.
Example
In the following example, suppose that the VPC has both an IPv4 CIDR block and an IPv6 CIDR block. In the route table:
-
IPv6 traffic destined to remain within the VPC (
2001:db8:1234:1a00::/56) is covered by the Local route, and is routed within the VPC. -
IPv4 and IPv6 traffic are treated separately; therefore, all IPv6 traffic (except for traffic within the VPC) is routed to the egress-only internet gateway.
-
There is a route for
172.31.0.0/16IPv4 traffic that points to a peering connection. -
There is a route for all IPv4 traffic (
0.0.0.0/0) that points to an internet gateway. -
There is a route for all IPv6 traffic (
::/0) that points to an egress-only internet gateway.
| Destination | Target |
|---|---|
10.0.0.0/16 |
Local |
2001:db8:1234:1a00::/56 |
Local |
172.31.0.0/16 |
pcx-11223344556677889 |
0.0.0.0/0 |
igw-12345678901234567 |
::/0 |
eigw-aabbccddee1122334 |
Route priority
We use the most specific route in your route table that matches the traffic to determine how to route the traffic (longest prefix match).
Routes to IPv4 and IPv6 addresses or CIDR blocks are independent of each other. We use the most specific route that matches either IPv4 traffic or IPv6 traffic to determine how to route the traffic.
For example, the following subnet route table has a route for IPv4 internet traffic (0.0.0.0/0) that points to an internet gateway, and a route for 172.31.0.0/16 IPv4 traffic that points to a peering connection (pcx-11223344556677889). Any traffic from the subnet that’s destined for the 172.31.0.0/16 IP address range uses the peering connection, because this route is more specific than the route for internet gateway. Any traffic destined for a target within the VPC (10.0.0.0/16) is covered by the Local route, and therefore is routed within the VPC. All other traffic from the subnet uses the internet gateway.
| Destination | Target |
|---|---|
10.0.0.0/16 |
Local |
172.31.0.0/16 |
pcx-11223344556677889 |
0.0.0.0/0 |
igw-12345678901234567 |
If you’ve attached a virtual private gateway to your VPC and enabled route propagation on your subnet route table, routes representing your Site-to-Site VPN connection automatically appear as propagated routes in your route table. If the propagated routes overlap with static routes and longest prefix match cannot be applied, the static routes take priority over the propagated routes. For more information, see Route tables and VPN route priority in the AWS Site-to-Site VPN User Guide.
In this example, your route table has a static route to an internet gateway (which you added manually), and a propagated route to a virtual private gateway. Both routes have a destination of 172.31.0.0/24. In this case, all traffic destined for 172.31.0.0/24 is routed to the internet gateway — it is a static route and therefore takes priority over the propagated route.
| Destination | Target |
|---|---|
10.0.0.0/16 |
Local |
172.31.0.0/24 |
vgw-11223344556677889 (propagated) |
172.31.0.0/24 |
igw-12345678901234567 (static) |
The same rule applies if your route table contains a static route to any of the following:
-
NAT gateway
-
Network interface
-
Instance ID
-
Gateway VPC endpoint
-
Transit gateway
-
VPC peering connection
-
Gateway Load Balancer endpoint
If the destinations for the static and propagated routes are the same, the static route takes priority.
Security groups
A security group acts as a virtual firewall for your instance to control inbound and outbound traffic. When you launch an instance in a VPC, you can assign up to five security groups to the instance. Security groups act at the instance level, not the subnet level. Therefore, each instance in a subnet in your VPC can be assigned to a different set of security groups.
For each security group, you add rules that control the inbound traffic to instances, and a separate set of rules that control the outbound traffic. This section describes the basic things that you need to know about security groups for your VPC and their rules.
You might set up network ACLs with rules similar to your security groups in order to add an additional layer of security to your VPC.
Security group basics
The following are the characteristics of security groups:
-
You can specify allow rules, but not deny rules.
-
You can specify separate rules for inbound and outbound traffic.
-
Security group rules enable you to filter traffic based on protocols and port numbers.
-
Security groups are stateful — if you send a request from your instance, the response traffic for that request is allowed to flow in regardless of inbound security group rules. Responses to allowed inbound traffic are allowed to flow out, regardless of outbound rules.
-
When you first create a security group, it has no inbound rules. Therefore, no inbound traffic originating from another host to your instance is allowed until you add inbound rules to the security group.
-
By default, a security group includes an outbound rule that allows all outbound traffic. You can remove the rule and add outbound rules that allow specific outbound traffic only. If your security group has no outbound rules, no outbound traffic originating from your instance is allowed.
-
There are quotas on the number of security groups that you can create per VPC, the number of rules that you can add to each security group, and the number of security groups that you can associate with a network interface.
-
Instances associated with a security group can’t talk to each other unless you add rules allowing the traffic (exception: the default security group has these rules by default).
-
Security groups are associated with network interfaces. After you launch an instance, you can change the security groups that are associated with the instance, which changes the security groups associated with the primary network interface (eth0). You can also specify or change the security groups associated with any other network interface. By default, when you create a network interface, it’s associated with the default security group for the VPC, unless you specify a different security group.
-
When you create a security group, you must provide it with a name and a description. The following rules apply:
-
Names and descriptions can be up to 255 characters in length.
-
Names and descriptions are limited to the following characters: a-z, A-Z, 0-9, spaces, and
._-:/()#,@[]+=&;{}!$*. -
When the name contains trailing spaces, we trim the space at the end of the name. For example, if you enter "Test Security Group " for the name, we store it as "Test Security Group".
-
A security group name cannot start with sg- as these indicate a default security group.
-
A security group name must be unique within the VPC.
-
-
security group can only be used in the VPC that you specify when you create the security group.
Default security group for your VPC
Your VPC automatically comes with a default security group. If you don’t specify a different security group when you launch the instance, we associate the default security group with your instance. Note
The following table describes the default rules for a default security group.
Inbound |
|||
Source |
Protocol |
Port range |
Description |
The security group ID (sg-xxxxxxxx) |
All |
All |
Allow inbound traffic from network interfaces (and their associated instances) that are assigned to the same security group. |
Outbound |
|||
Destination |
Protocol |
Port range |
Description |
0.0.0.0/0 |
All |
All |
Allow all outbound IPv4 traffic. |
::/0 |
All |
All |
Allow all outbound IPv6 traffic. This rule is added by default if you create a VPC with an IPv6 CIDR block or if you associate an IPv6 CIDR block with your existing VPC. |
Security group rules
You can add or remove rules for a security group (also referred to as authorizing or revoking inbound or outbound access). A rule applies either to inbound traffic (ingress) or outbound traffic (egress). You can grant access to a specific CIDR range, or to another security group in your VPC or in a peer VPC (requires a VPC peering connection).
The rules of a security group control the inbound traffic that’s allowed to reach the instances that are associated with the security group. The rules also control the outbound traffic that’s allowed to leave them.
The following are the characteristics of security group rules:
-
By default, security groups allow all outbound traffic.
-
Security group rules are always permissive; you can’t create rules that deny access.
-
Security group rules enable you to filter traffic based on protocols and port numbers.
-
Security groups are stateful—if you send a request from your instance, the response traffic for that request is allowed to flow in regardless of the inbound rules. This also means that responses to allowed inbound traffic are allowed to flow out, regardless of the outbound rules.
-
You can add and remove rules at any time. Your changes are automatically applied to the instances that are associated with the security group.
-
The effect of some rule changes can depend on how the traffic is tracked.
-
When you associate multiple security groups with an instance, the rules from each security group are effectively aggregated to create one set of rules. Amazon EC2 uses this set of rules to determine whether to allow access.
-
You can assign multiple security groups to an instance. Therefore, an instance can have hundreds of rules that apply. This might cause problems when you access the instance. We recommend that you condense your rules as much as possible.
-
For each rule, you specify the following:
-
Name: The name for the security group (for example, my-security-group).
A name can be up to 255 characters in length. Allowed characters are a-z, A-Z, 0-9, spaces, and
._-:/()#,@[]+=;{}!$*. When the name contains trailing spaces, we trim the spaces when we save the name. For example, if you enter "Test Security Group " for the name, we store it as "Test Security Group". -
Protocol: The protocol to allow. The most common protocols are 6 (TCP), 17 (UDP), and 1 (ICMP).
-
Port range: For TCP, UDP, or a custom protocol, the range of ports to allow. You can specify a single port number (for example, 22), or range of port numbers (for example, 7000-8000).
-
ICMP type and code: For ICMP, the ICMP type and code.
-
Source or destination: The source (inbound rules) or destination (outbound rules) for the traffic. Specify one of these options:
-
A single IPv4 address. You must use the
/32prefix length; for example,203.0.113.1/32. -
A single IPv6 address. You must use the
/128prefix length; for example,2001:db8:1234:1a00::123/128. -
A range of IPv4 addresses, in CIDR block notation; for example,
203.0.113.0/24. -
A range of IPv6 addresses, in CIDR block notation; for example,
2001:db8:1234:1a00::/64. -
The ID of a prefix list; for example,
pl-1234abc1234abc123. -
Another security group. This allows instances that are associated with the specified security group to access instances associated with this security group. Choosing this option does not add rules from the source security group to this security group. You can specify one of the following security groups:
-
The current security group
-
A different security group for the same VPC
-
A different security group for a peer VPC in a VPC peering connection
-
-
-
(Optional) Description: You can add a description for the rule, which can help you identify it later. A description can be up to 255 characters in length. Allowed characters are a-z, A-Z, 0-9, spaces, and
._-:/()#,@[]+=;{}!$*.
Network ACLs
A network access control list (ACL) is an optional layer of security for your VPC that acts as a firewall for controlling traffic in and out of one or more subnets. You might set up network ACLs with rules similar to your security groups in order to add an additional layer of security to your VPC.
Network ACL basics
The following are the basic things that you need to know about network ACLs:
-
Your VPC automatically comes with a modifiable default network ACL. By default, it allows all inbound and outbound IPv4 traffic and, if applicable, IPv6 traffic.
-
You can create a custom network ACL and associate it with a subnet. By default, each custom network ACL denies all inbound and outbound traffic until you add rules.
-
Each subnet in your VPC must be associated with a network ACL. If you don’t explicitly associate a subnet with a network ACL, the subnet is automatically associated with the default network ACL.
-
You can associate a network ACL with multiple subnets. However, a subnet can be associated with only one network ACL at a time. When you associate a network ACL with a subnet, the previous association is removed.
-
A network ACL contains a numbered list of rules. We evaluate the rules in order, starting with the lowest numbered rule, to determine whether traffic is allowed in or out of any subnet associated with the network ACL. The highest number that you can use for a rule is 32766. We recommend that you start by creating rules in increments (for example, increments of 10 or 100) so that you can insert new rules where you need to later on.
-
A network ACL has separate inbound and outbound rules, and each rule can either allow or deny traffic.
-
Network ACLs are stateless, which means that responses to allowed inbound traffic are subject to the rules for outbound traffic (and vice versa).
Network ACL rules
You can add or remove rules from the default network ACL, or create additional network ACLs for your VPC. When you add or remove rules from a network ACL, the changes are automatically applied to the subnets that it’s associated with.
The following are the parts of a network ACL rule:
-
Rule number. Rules are evaluated starting with the lowest numbered rule. As soon as a rule matches traffic, it’s applied regardless of any higher-numbered rule that might contradict it.
-
Type. The type of traffic; for example, SSH. You can also specify all traffic or a custom range.
-
Protocol. You can specify any protocol that has a standard protocol number.
If you specify ICMP as the protocol, you can specify any or all of the ICMP types and codes.
-
Port range. The listening port or port range for the traffic. For example, 80 for HTTP traffic.
-
Source. [Inbound rules only] The source of the traffic (CIDR range).
-
Destination. [Outbound rules only] The destination for the traffic (CIDR range).
-
Allow/Deny. Whether to allow or deny the specified traffic.
Default network ACL
The default network ACL is configured to allow all traffic to flow in and out of the subnets with which it is associated. Each network ACL also includes a rule whose rule number is an asterisk. This rule ensures that if a packet doesn’t match any of the other numbered rules, it’s denied. You can’t modify or remove this rule.
The following is an example default network ACL for a VPC that supports IPv4 only.
Inbound |
|||||
Rule # |
Type |
Protocol |
Port range |
Source |
Allow/Deny |
100 |
All IPv4 traffic |
All |
All |
0.0.0.0/0 |
ALLOW |
* |
All IPv4 traffic |
All |
All |
0.0.0.0/0 |
DENY |
Outbound |
|||||
Rule # |
Type |
Protocol |
Port range |
Destination |
Allow/Deny |
100 |
All IPv4 traffic |
All |
All |
0.0.0.0/0 |
ALLOW |
* |
All IPv4 traffic |
All |
All |
0.0.0.0/0 |
DENY |