Testing in Go Language
- The go test Tool
- Test Functions
- Randomized Testing
- Testing a Command
- White-Box Testing
- External Test Packages
- Writing Effective Tests
- Avoiding Brittle Tests
- Coverage
- Benchmark Functions
- Profiling
- Example Functions
- References
Go’s approach to testing relies on one command, go test, and a set of conventions for writing test functions that go test can run. It is effective for pure testing, and it extends naturally to benchmarks and systematic examples for documentation.
The go test Tool
The go test subcommand is a test driver for Go packages that are orgnized according to certain conventions. In a package directory, files whose names end with _test.go are not part of the package ordinarily built by go build but are a part of it when built by go test.
Within *_test.go files, three kinds of functions are treated specially: tests, benchmarks, and examples. A test function, which is a function whose name begins with Test, exercises some program logic for correct behavior; go test calls the test function and report the result, which is either PASS or FAIL. A benchmark function has a name beginning with Benchmark and measures the performance of some operation; go test reports the mean execution time of the operation. And an example function, whose name starts with Example, provides machine-checked documentation.
Test Functions
Each test file must import the testing package. Test functions have the following signature:
func TestName(t *testing.T) {
}
Test function names must begin with Test; the optional suffix Name must begin with a capital letter:
func TestSin(t *testing.T) { /* ... */ }
func TestCos(t *testing.T) { /* ... */ }
func TestLog(t *testing.T) { /* ... */ }
The t parameter provides methods for reporting test failures and logging additional information.
func TestPalindrome(t *testing.T) {
	if !IsPalindrome("detartrated") {
		t.Error(`IsPalindrome("detartrated") = false`)
	}
	if !IsPalindrome("kayak") {
		t.Error(`IsPalindrome("kayak") = false`)
	}
}

func TestNonPalindrome(t *testing.T) {
	if IsPalindrome("palindrome") {
		t.Error(`IsPalindrome("palindrome") = true`)
	}
}

// a table-driven test
func TestIsPalindrome(t *testing.T) {
	var tests = []struct {
		input string
		want  bool
	}{
		{"", true},
		{"a", true},
		{"aa", true},
		{"ab", false},
		{"kayak", true},
	}
	for _, test := range tests {
		if got := IsPalindrome(test.input); got != test.want {
			t.Errorf("IsPalindrome(%q) = %v", test.input, got)
		}
	}
}
Test failure messages are usually of the form “f(x) = y, want z”, where f(x) explains the attempted operation and its input, y is the actual result, and z is the expected result.
Randomized Testing
Table-driven tests are convenient for checking that a function works on inputs carefully selected to exercise interesting cases in the logic. Another approach, randomized testing, explores a broader range of inputs by constructing inputs at random.
import "math/rand"

// randomPalindrome returns a palindrome whose length and contents
// are derived from the pseudo-random number generator rng.
func randomPalindrome(rng *rand.Rand) string {
	n := rng.Intn(25) // random length up to 24
	runes := make([]rune, n)
	for i := 0; i < (n+1)/2; i++ {
		r := rune(rng.Intn(0x1000)) // random rune up to '\u0999'
		runes[i] = r
		runes[n-1-i] = r
	}
	return string(runes)
}

func TestRandomPalindromes(t *testing.T) {
	// Initialize a pseudo-random number generator.
	seed := time.Now().UTC().UnixNano()
	t.Logf("Random seed: %d", seed)
	rng := rand.New(rand.NewSource(seed))
	for i := 0; i < 1000; i++ {
		p := randomPalindrome(rng)
		if !IsPalindrome(p) {
			t.Errorf("IsPalindrome(%q) = false", p)
		}
	}
}
Testing a Command
A package named main ordinarily produces an executable program, but it can be imported as a library too.
// Echo prints its command-line arguments.
package main

import (
	"flag"
	"fmt"
	"io"
	"os"
	"strings"
)

var (
	n = flag.Bool("n", false, "omit trailing newline")
	s = flag.String("s", " ", "separator")
)

var out io.Writer = os.Stdout // modified during testing

func main() {
	flag.Parse()
	if err := echo(!*n, *s, flag.Args()); err != nil {
		fmt.Fprintf(os.Stderr, "echo: %v\n", err)
		os.Exit(1)
	}
}
func echo(newline bool, sep string, args []string) error {
	fmt.Fprint(out, strings.Join(args, sep))
	if newline {
		fmt.Fprintln(out)
	}
	return nil
}
By having echo write through the global variable, out, not directly to os.Stdout, the tests can substitute a different Writer implementation that records what was written for later inspection. Here’s the test, in file echo_test.go:
package main

import (
	"bytes"
	"fmt"
	"testing"
)

func TestEcho(t *testing.T) {
	var tests = []struct {
		newline bool
		sep     string
		args    []string
		want    string
	}{
		{true, "", []string{}, "\n"},
		{false, "", []string{}, ""},
		{true, "\t", []string{"one", "two", "three"}, "one\ttwo\tthree\n"},
		{true, ",", []string{"a", "b", "c"}, "a,b,c\n"},
		{false, ":", []string{"1", "2", "3"}, "1:2:3"},
	}
	for _, test := range tests {
		descr := fmt.Sprintf("echo(%v, %q, %q)",
			test.newline, test.sep, test.args)
		out = new(bytes.Buffer) // captured output
		if err := echo(test.newline, test.sep, test.args); err != nil {
			t.Errorf("%s failed: %v", descr, err)
			continue
		}
		got := out.(*bytes.Buffer).String()
		if got != test.want {
			t.Errorf("%s = %q, want %q", descr, got, test.want)
		}
	}
}
Although the package name of the test code is main and it defines a main function, during testing this package acts as a library that exposes the function TestEcho to the test driver; its main function is ignored.
White-Box Testing
One way of categorizing tests is by the level of knowledge they require of the internal workings of the package under test. A black-box test assumes nothing about the package other than what is exposed by its API and specified by its documentation; the package’s internal are opaque. In contrast, a white-box test has privileged access to the internal functions and data structres of th package and can make observations and changes that an ordinary client can not.
The two approaches are complementary. Black-box tests are usually more robust, needing fewer updates as the software evolves. They also help the test author empathize with the client of the package and can reveal flaws in the API design. In contrast, white-box tests can provide more detailed coverage of the trickier parts of the implementation.
External Test Packages
Consider the package net/url, which provides a URL parser, and net/http, which provides a web server and HTTP client library. As we might expect, the higher-level net/http depends on the lover-level net/url. However, one of the tests in net/url is an example demonstrating the interaction between URLs and the HTTP client library. In other words, a test of the lover-level package imports the higher-level packages.
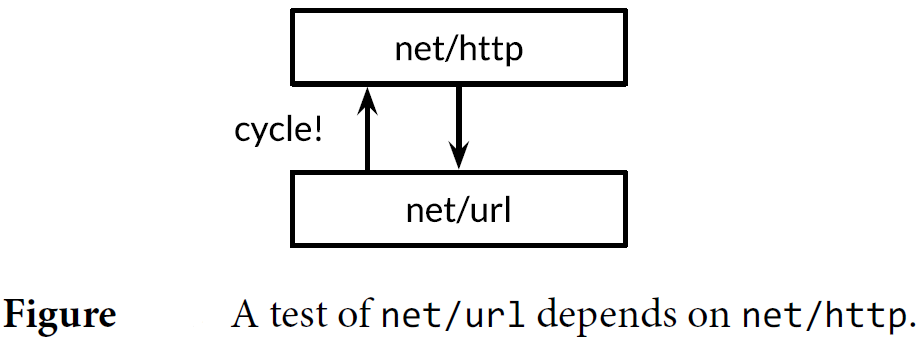
Declaring this test function in the net/url package would create a cycle in the package import graph.
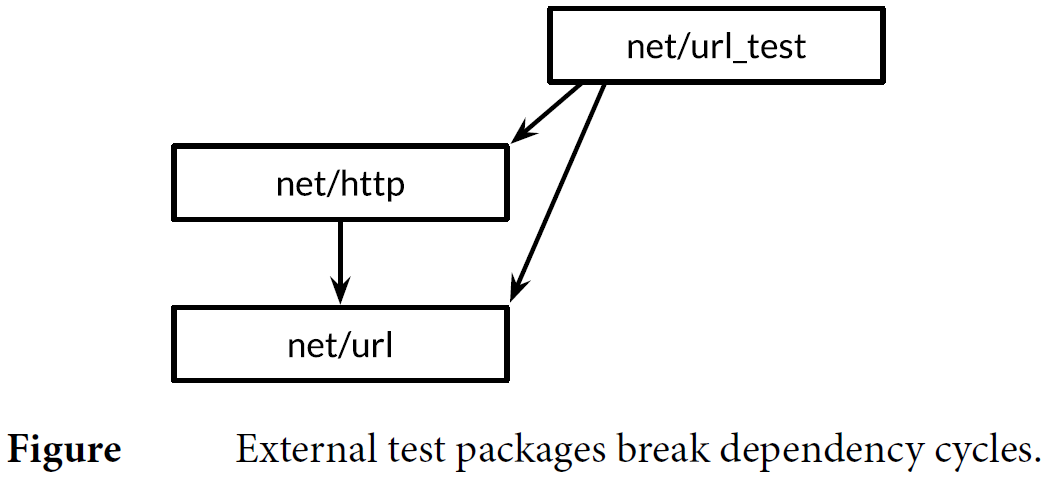
We resolve the problem by declaring the test function in an external test package, that is, in a file the net/url directory whose package declaration reads package url_test. The extral suffix _test is a signal to go test that it should build an additional package containing just these files and run its tests.
In terms of the design layers, the external test package is logically higher up than both of the package it depends upon.
We can use the go list tool to summarize which Go source files in a package directory are production code, in-pcakges tests, and external tests.
GoFiles is the list of files that contain the production code; this are the files that go build will include in your application:
$ go list -f={{.GoFiles}} fmt
[doc.go format.go print.go scan.go]
TestGoFiles is the list of files that also belong to the fmt package, but these files, whose names all end in _test.go, are included only when building tests:
$ go list -f={{.TestGoFiles}} fmt
[export_test.go]
XTestGoFiles is the list of files that constitute the external test package, fmt_test, so these files must import the fmt package in order to use it. Again, they are included only during testing:
$ go list -f={{.XTestGoFiles}} fmt
[fmt_test.go scan_test.go stringer_test.go]
Sometimes an external test package may need privileged access to the internals of the package under test, if for example a white-box test must live in a separate package to avoid an import cycle. In such cases, we use a trick: we add declaration to an in-package _test.go file to expose the necessary internals to the external test. This file thus offers the test a “back door” to the package. If the source file exists only for this purpose and contains no tests itself, it is often called export_test.go.
Writing Effective Tests
Other languages’ frameworks provide mechanisms for identifying test functions (often using reflection or metadata), hooks for perforrming “setup” and “teardown” operations before and after the tests run, and libraries of utility functions for asserting common predicates, comparing values, formatting error messages, and aborting a failed test (often using exceptions). Although these mechanisms can make tests very concise, the resulting tests often seem like they are written in a foreign language. Furthermore, although they may report PASSS or FALL correctly, their manner may be unfriendly to the unfortunate maintainer, with cryptic failure message like “assert: 0 == 1” or page after page of stack traces.
A good test does not explode on failure but prints a clear and succinct description of the symptom of the problem, and perhaps other relevant facts about the context. Ideally, the maintainer should not need to read the source code to decipher a test failure. A good test should not give up after one failure but should try to report several errors in a single run, since the pattern of failures may itself be revealing.
The assertion function below compares two values, constructs a generic error message, and stops the program. It’s easy to use and it’s correct, but when it fails, the error message is almost useless.
import (
	"fmt"
	"strings"
	"testing"
)

// A poor assertion function.
func assertEqual(x, y int) {
	if x != y {
		panic(fmt.Sprintf("%d != %d", x, y))
	}
}
func TestSplit(t *testing.T) {
	words := strings.Split("a:b:c", ":")
	assertEqual(len(words), 3)
	// ...
}
In this sense, assertion functions suffer from premature abstraction: by treating the failure of this particular test as a mere difference of two integers, we forfeit the opportunity to provide meaningful context. We can provide a better message by starting from the concrete details, as in the example below.
import (
	"strings"
	"testing"
)

func TestSplit(t *testing.T) {
	var tests = []struct {
		s    string
		sep  string
		want int
	}{
		{"a:b:c", ":", 3},
	}
	for _, test := range tests {
		words := strings.Split(test.s, test.sep)
		if got := len(words); got != test.want {
			t.Errorf("Split(%q, %q) returned %d words, want %d",
				test.s, test.sep, got, test.want)
		}
	}
}
Now the test reports the function that was called, its inputs, and the significance of the results; it explicitly identifies the actual value and the expectation; and it continues to execute even if this assertion should fail.
Avoiding Brittle Tests
An application that often fails when it encounters new but valid inputs is called buggy; a test that spuriously fails when a sound change was made to the program is called brittle. Just as a buggy program frustrates its users, a brittle test exasperates its maintainers. The most brittle tests, which fail from almost any change to the production code, good or bad, are sometimes called change detector or status quo tests, and the time dealing with them can quickly deplete any benefit they once seemed to provide.
The easiest way to avoid brittle tests is to check only the properties you care about. Test your program’s simpler and more stable interfaces in preference to its internal functions. Be selective in your assertions. Don’t check for exact string matches, for example, but look for relevant substrings that remain unchanged as the program evolves. It’s often worth writing a substantial function to distill a complex output down to its essence so that assertions will be reliable. Even though that may seem like a lot of up-front effort, it can pay for itself quickly in time that would otherwise be spent fixing spuriously failing tests.
Coverage
No quantity of tests can ever prove a package free of bugs. At best, they increase our confidence that the package works well in a wide range of important scenarios.
The degree to which a test exercises the package under test is called the test’s coverage. Statement coverage is the simplest and most widely used of these heuristics. The statement coverage of a test suite is the fraction of source statements that are executed at least once during the test. We’ll use the Go’s cover tool, which is integrated into go test, to measure statement coverage and help identify obvious gaps in the tests.
This command displays the usage message of the coverage tool:
$ go tool cover
Usage of 'go tool cover':
Given a coverage profile produced by 'go test':
        go test -coverprofile=c.out

Open a web browser displaying annotated source code:
        go tool cover -html=c.out

Write out an HTML file instead of launching a web browser:
        go tool cover -html=c.out -o coverage.html

Display coverage percentages to stdout for each function:
        go tool cover -func=c.out
The go tool command runs one of the executable from the Go toolchain. These programs live in the directory $GOROOT/pkg/tool/${GOOS}_${GOARCH}.
package cover

func foo(s string) string {
        return s
}

func bar(s string) string {
        return s
}
package cover

import "testing"

func TestFoo(t *testing.T) {
        var tests = []struct {
                s    string
                want string
        }{
                {"hello", "hello"},
                {"world", "world"},
        }

        for _, test := range tests {
                if got := foo(test.s); got != test.want {
                        t.Errorf("foo(%q) == %q, want %q", test.s, got, test.want)
                }
        }
}
$ go test -covermode=count
PASS
coverage: 50.0% of statements
ok      gopl.io/ch11/cover      0.002s
$ go test -coverprofile=c.out
PASS
coverage: 50.0% of statements
ok      gopl.io/ch11/cover      0.002s
$ go tool cover -func=c.out
gopl.io/ch11/cover/cover.go:3:  foo             100.0%
gopl.io/ch11/cover/cover.go:7:  bar             0.0%
total:                          (statements)    50.0%
Benchmark Functions
Benchmarking is the practice of measuring the performance of a program on a fixed workload. In Go, a benchmark function looks like a test function, but with the Benchmark prefix and a *testing.B parameter that provides most of the same methods as a *testing.T, plus a few extra related to performance measurement. It also exposes an integer filed N, which specifies the number of times to perform the operation being measured.
func foo(s string) string {
	var letters []rune
	for _, b := range s {
		letters = append(letters, b)
	}
	return string(letters)
}

func bar(s string) string {
	// pre-allocate a sufficiently large array for use by letters,
	// rather than expand it by successive calls to append
	letters := make([]rune, 0, len(s))
	for _, b := range s {
		letters = append(letters, b)
	}
	return string(letters)
}

func BenchmarkFoo(b *testing.B) {
	for n := 0; n < b.N; n++ {
		foo("hello world")
	}
}

func BenchmarkBar(b *testing.B) {
	for n := 0; n < b.N; n++ {
		bar("hello world")
	}
}
Unlike tests, by default no benchmarks are run. The argument to the -bench flag selects which benchmarks to run. It is a regular expression matching the names of Benchmark functions, with a default value that matches none of them. The “.” pattern causes it to match all benchmarks.
BenchmarkFoo-2           5000000               339 ns/op
BenchmarkBar-2          10000000               188 ns/op
PASS
ok      _/tmp   4.123s
The benchmark names’s numeric suffix, 2 here, indicates the value of GOMAXPROCS, which is important for concurrent benchmarks.
The report tells us that each call to foo took about 0.339 microseconds, averaged over 5000000 runs.
The -benchmem command-line flag will include memory allocation statistics in its report.
$ go test -bench=. -benchmem
BenchmarkFoo-2           5000000               333 ns/op             136 B/op          5 allocs/op
BenchmarkBar-2          10000000               188 ns/op              64 B/op          2 allocs/op
PASS
ok      _/tmp   4.088s
Benchmarks like this tell us the absolute time required for a given operation, but in many settings the interesting performance questions are about the relative timings of two different operations. For example, if a function takes 1ms to process 1,000 elements, how long will it take to process 10,000 or a million?
Comarative benchmarks are just regular code. They typically take the form os a single parameterized function, called from several Benchmark function with different values, like this:
func benchmark(b *testing.B, size int) { /* ... */ }
func Benchmark10(b *testing.B)         { benchmark(b, 10) }
func Benchmark100(b *testing.B)        { benchmark(b, 100) }
func Benchmark1000(b *testing.B)       { benchmark(b, 1000) }
Profiling
Benchmarks are useful for measuring the performance of specific operations, but when we’re trying to make a slow program faster, we often have no idea where to begin.
Programmer waste enormous amounts of time thinking about, or worry about, the speed of noncritical parts of their programs. We should forget about small efficiencies, say about 97% of the time: premature optimization is the root of all evil. Yet we should not pass up our opportunities in that critical 3%.
When we wish to look carefully at the speed of our programs, the best technique for identifying the critical code is profiling. Profiling is an automated approach to performance measurement based on sampling a number of profile events during execution, then extrapolating from them during a post-processing step; the resutling statistical summary is called a profile.
The go test tool has built-in support for serval kinds of profiling.
A CPU profile identifies the functions whose executation reuqires the most CPU time. The currently running thread on each CPU is interrupted periodically by the operating system every few milliseconds, with each interruption recording once profile event before normal execution resumes.
A heap profile identifies the statements responsible for allocating the most memory. The profiling library samples calls to the internal memory allocation routines so that on average, on profile event is recorded per 512KB of allocated memory.
A blocking profile identifies the operations resposible for blocking goroutines the longest, such system calls, channel sends and receives, and acquisitions of locks. The profiling library records an event every time a goroutine is blocked by one the these operations.
Gathering a profile for code under test is as easy as enabling one of the flags below. Be careful when using more than one flag at a time, however: the machinery for gathering one kind of profile may skew the results of others.
$ go test -cpuprofile=cpu.log
$ go test -blockprofile=block.log
$ go test -memprofile=mem.log
Profiling is especially useful in lonng-running applications, so the Go runtime’s profiling features can be eanbled under programmer control using the runtime API.
Once we’ve gathered a profile, we need to analyze it using the pprof tool. This is a standard part of the Go distribution, but since it’s not an everyday tool, it’s accessed indirectly using go tool pprof.
To make profiling efficient and save space, the log does not include function names; instead, functions are identified by their address. This mean that pprof needs the executalbe in order to make sense of the log. Although go test usually discards the test executable once the test is complete, when profiling is enabled it saves the executable as foo.test, where foo is the name of the tested package.
The command below show how to gather and display a simple CPU profile. We’ve selected one of the benchmarks from the net/http package. It is usually better to profile specific benchmarks that have been constuctured to be representative of workloads one cares about. Benchmarking test cases is almost never representative, which is why we disabled them by using the filter -run=NONE.
$ go test -run=NONE -bench=ClientServerParallelTLS64 -cpuprofile=cpu.log net/http
BenchmarkClientServerParallelTLS64-2       30000             47156 ns/op           5201 B/op          67 allocs/op
PASS
ok      net/http        2.726s
$ go tool pprof -text -nodecount=5 ./http.test cpu.log
1380ms of 4870ms total (28.34%)
Dropped 203 nodes (cum <= 24.35ms)
Showing top 5 nodes out of 223 (cum >= 140ms)
      flat  flat%   sum%        cum   cum%
     760ms 15.61% 15.61%      840ms 17.25%  syscall.Syscall
     170ms  3.49% 19.10%      490ms 10.06%  runtime.mallocgc
     170ms  3.49% 22.59%      170ms  3.49%  runtime.memmove
     140ms  2.87% 25.46%      320ms  6.57%  runtime.pcvalue
     140ms  2.87% 28.34%      140ms  2.87%  vendor/golang_org/x/crypto/curve25519.ladderstep
Example Functions
The third kind of function treated specially by go test is an example function, one whose name starts with Exmaple. It has neither parameters nor results. Here’s an example function for IsPalindrome:
func ExampleIsPalindrome() {
	fmt.Println(IsPalindrome("A man, a plan, a canal: Panama"))
	fmt.Println(IsPalindrome("palindrome"))
	// Output:
	// true
	// false
}
Example functions serve three purposes. The primary one is documentation: a good example can be a more succinct or intuitive way to convey the behavior of a library function than its prose description, especially when used as a reminder or quick reference. An example can also demostrate the interaction between several types and functions belonging to one API, whereas prose documentation must always be attached to one place, like a type or function declaration or the package as a whole. And unlike exmpales within comments, example functions are real Go code, subject to compile-time checking, so they don’t become stale as the code evolves.
Based on the suffix of the Example function, the web-based documentation server godoc associates example functions with the function or package they exemplify, so ExampleIsPanlidrome would be shown with the documentation for the IsPalindrome function, and an example called just Example would be associated with the word package as a whole.
The second purpose is that examples are executable tests run by go test. If the exaple function contains a final // Output: comment like the one above, the test driver will execute the function and check that what it printed to its standard output matches the text within the comment.
The third purpose of an example is hands-on experimentation. The godoc server at golang.org uses the Go Playground to let the user edit and run each example function from within a web browser.
References
- Alan A. A. Donovan, Brian W. Kernighan. The Go Programming Language, 2015.11.
- testing - The Go Programming Language
- TableDrivenTests · golang/go Wiki
- Profiling Go Programs - The Go Blog
- The cover story - The Go Programming Language