Linux CGroups and Containers
1. What are Control Groups
Linux Control Groups (cgroups) enable limits on the use of system hardware, ensuring that an individual process running inside a cgroup only utilizes as much as has been allowed in the cgroups configuration. [1]
Control Groups restrict the volume of usage on a resource that has been enabled by a namespace. For example, the network namespace allows a process to access a particular network card, the cgroup ensures that the process does not exceed 50% usage of that card, ensuring bandwidth is available for other processes.
Control Group Namespaces provide a virtualized view of individual cgroups through the /proc/self/ns/cgroup interface.
Namespaces are a kernel feature that allow a virtual view of isolated system resources. By isolating a process from system resources, you can specify and control what a process is able to interact with.
Namespaces are an essential part of Control Groups, and a fundamental aspect of containers in Linux. [2][19]
-
Mount
The mount namespace isolates file system mount points, enabling each process to have a distinct filesystem space within wich to operate.
-
UTS
UTS (UNIX Time-Sharing) namespaces allow a single system to appear to have different host and domain names to different processes.
-
IPC
System V IPC, POSIX message queues
-
PID
Process IDs
-
Network
Network namespaces virtualize the network stack. On creation, a network namespace contains only a loopback interface.
Each network interface (physical or virtual) is present in exactly 1 namespace and can be moved between namespaces.
Each namespace will have a private set of IP addresses, its own routing table, socket listing, connection tracking table, firewall, and other network-related resources.
Destroying a network namespace destroys any virtual interfaces within it and moves any physical interfaces within it back to the initial network namespace.
-
User
User and group IDs
-
Control Groups
Isolates cgroups
1.1. What are Resource Controllers
A resource controller, also called a cgroup subsystem, represents a single resource, such as CPU time or memory. The Linux kernel provides a range of resource controllers, that are mounted automatically by systemd. [3]
Find the list of currently mounted resource controllers in /proc/cgroups.
|
-
blkio — sets limits on input/output access to and from block devices;
-
cpu — uses the CPU scheduler to provide cgroup tasks access to the CPU. It is mounted together with the
cpuacctcontroller on the same mount; -
cpuacct — creates automatic reports on CPU resources used by tasks in a cgroup. It is mounted together with the
cpucontroller on the same mount; -
cpuset — assigns individual CPUs (on a multicore system) and memory nodes to tasks in a cgroup;
-
devices — allows or denies access to devices for tasks in a cgroup;
-
freezer — suspends or resumes tasks in a cgroup;
-
memory — sets limits on memory use by tasks in a cgroup and generates automatic reports on memory resources used by those tasks;
-
net_cls — tags network packets with a class identifier (classid) that allows the Linux traffic controller (the
tccommand) to identify packets originating from a particular cgroup task. A subsystem ofnet_cls, thenet_filter(iptables) can also use this tag to perform actions on such packets. Thenet_filtertags network sockets with a firewall identifier (fwid) that allows the Linux firewall (theiptablescommand) to identify packets (skb→sk) originating from a particular cgroup task; -
perf_event — enables monitoring cgroups with the perf tool;
-
hugetlb — allows to use virtual memory pages of large sizes and to enforce resource limits on these pages.
1.2. How Control Groups are Organized
Cgroups are organized hierarchically, like processes, and child cgroups inherit some of the attributes of their parents. However, there are differences between the two models. [5]
1.2.1. The Linux Process Model
All processes on a Linux system are child processes of a common parent: the init process, which is executed by the kernel at boot time and starts other processes (which may in turn start child processes of their own). Because all processes descend from a single parent, the Linux process model is a single hierarchy, or tree.
Additionally, every Linux process except init inherits the environment (such as the PATH variable) and certain other attributes (such as open file descriptors) of its parent process.
1.2.2. The Cgroup Model
Cgroups are similar to processes in that: they are hierarchical, and child cgroups inherit certain attributes from their parent cgroup.
The fundamental difference is that many different hierarchies of cgroups can exist simultaneously on a system. If the Linux process model is a single tree of processes, then the cgroup model is one or more separate, unconnected trees of tasks (i.e. processes).
Multiple separate hierarchies of cgroups are necessary because each hierarchy is attached to one or more subsystems.
Remember that system processes are called tasks in cgroup terminology.
Here are a few simple rules governing the relationships between subsystems, hierarchies of cgroups, and tasks, along with explanations of the consequences of those rules.
-
Rule 1
A single hierarchy can have one or more subsystems attached to it.
As a consequence, the
cpuandmemorysubsystems (or any number of subsystems) can be attached to a single hierarchy, as long as each one is not attached to any other hierarchy which has any other subsystems attached to it already (see Rule 2).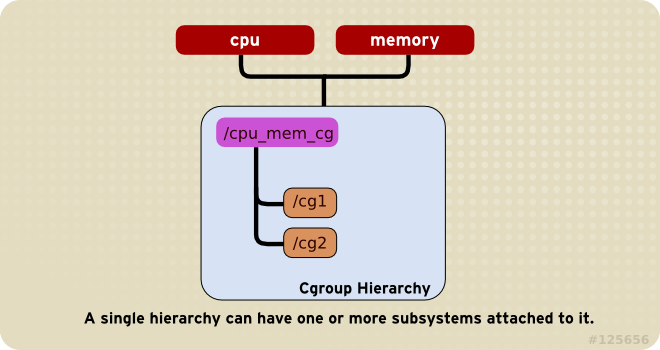
-
Rule 2
Any single subsystem (such as
cpu) cannot be attached to more than one hierarchy if one of those hierarchies has a different subsystem attached to it already.As a consequence, the
cpusubsystem can never be attached to two different hierarchies if one of those hierarchies already has thememorysubsystem attached to it. However, a single subsystem can be attached to two hierarchies if both of those hierarchies have only that subsystem attached.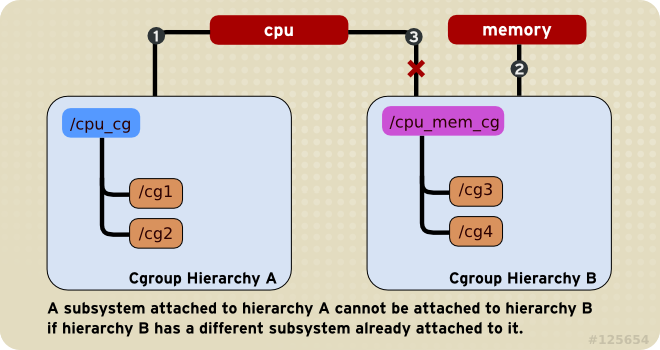
-
Rule 3
Each time a new hierarchy is created on the systems, all tasks on the system are initially members of the default cgroup of that hierarchy, which is known as the root cgroup. For any single hierarchy you create, each task on the system can be a member of exactly one cgroup in that hierarchy.
A single task may be in multiple cgroups, as long as each of those cgroups is in a different hierarchy.
As soon as a task becomes a member of a second cgroup in the same hierarchy, it is removed from the first cgroup in that hierarchy. At no time is a task ever in two different cgroups in the same hierarchy.
As a consequence, if the
cpuandmemorysubsystems are attached to a hierarchy namedcpu_mem_cg, and thenet_clssubsystem is attached to a hierarchy namednet, then a runninghttpdprocess could be a member of any one cgroup incpu_mem_cg, and any one cgroup innet.The cgroup in
cpu_mem_cgthat thehttpdprocess is a member of might restrict its CPU time to half of that allotted to other processes, and limit its memory usage to a maximum of1024MB. Additionally, the cgroup innetthat thehttpdprocess is a member of might limit its transmission rate to30MB/s (megabytes per second).When the first hierarchy is created, every task on the system is a member of at least one cgroup: the root cgroup. When using cgroups, therefore, every system task is always in at least one cgroup.

-
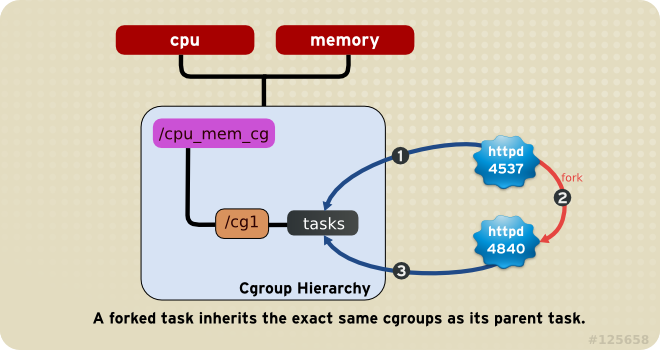
Rule 4
Any process (task) on the system which forks itself creates a child task. A child task automatically inherits the cgroup membership of its parent but can be moved to different cgroups as needed. Once forked, the parent and child processes are completely independent.
As a consequence, consider the
httpdtask that is a member of the cgroup namedhalf_cpu_1gb_maxin thecpu_and_memhierarchy, and a member of the cgrouptrans_rate_30in thenethierarchy. When thathttpdprocess forks itself, its child process automatically becomes a member of thehalf_cpu_1gb_maxcgroup, and thetrans_rate_30cgroup. It inherits the exact same cgroups its parent task belongs to.From that point forward, the parent and child tasks are completely independent of each other: changing the cgroups that one task belongs to does not affect the other. Neither will changing cgroups of a parent task affect any of its grandchildren in any way. To summarize: any child task always initially inherits memberships to the exact same cgroups as their parent task, but those memberships can be changed or removed later.
1.3. Systemd
Systemd is a system and service manager for Linux operating systems. It is designed to be backwards compatible with SysV init scripts, and provides a number of features such as parallel startup of system services at boot time, on-demand activation of daemons, or dependency-based service control logic. [4]
Systemd introduces the concept of systemd units, represented by unit configuration files.
| Unit Type | File Extension | Description |
|---|---|---|
Service unit |
|
A system service. |
Target unit |
|
A group of systemd units. |
Automount unit |
|
A file system automount point. |
Device unit |
|
A device file recognized by the kernel. |
Mount unit |
|
A file system mount point. |
Path unit |
|
A file or directory in a file system. |
Scope unit |
|
An externally created process. |
Slice unit |
|
A group of hierarchically organized units that manage system processes. |
Snapshot unit |
|
A saved state of the systemd manager. |
Socket unit |
|
An inter-process communication socket. |
Swap unit |
|
A swap device or a swap file. |
Timer unit |
|
A systemd timer. |
| Directory | Description |
|---|---|
|
Systemd unit files distributed with installed RPM packages. |
|
Systemd unit files created at run time. This directory takes precedence over the directory with installed service unit files. |
|
Systemd unit files created by systemctl enable as well as unit files added for extending a service. This directory takes precedence over the directory with runtime unit files. |
By default, systemd automatically creates a hierarchy of slice, scope and service units to provide a unified structure for the cgroup tree. Also, systemd automatically mounts hierarchies for important kernel resource controllers in the /sys/fs/cgroup/ directory. [3]
All processes running on the system are child processes of the systemd init process. Systemd provides three unit types that are used for the purpose of resource control:
-
Service — A process or a group of processes, which systemd started based on a unit configuration file. Services encapsulate the specified processes so that they can be started and stopped as one set.
-
Scope — A group of externally created processes. Scopes encapsulate processes that are started and stopped by arbitrary processes through the
fork()function and then registered by systemd at runtime. For instance, user sessions, containers, and virtual machines are treated as scopes. -
Slice — A group of hierarchically organized units. Slices do not contain processes, they organize a hierarchy in which scopes and services are placed. The actual processes are contained in scopes or in services. In this hierarchical tree, every name of a slice unit corresponds to the path to a location in the hierarchy. The dash (“-”) character acts as a separator of the path components.
Services, scopes, and slices are created manually by the system administrator or dynamically by programs. By default, the operating system defines a number of built-in services that are necessary to run the system.
Use the systemctl command to list system units and to view their status. Also, the systemd-cgls command is provided to view the hierarchy of control groups and systemd-cgtop to monitor their resource consumption in real time.
-
Use the following command to list all active units on the system:
systemctl list-unitsThe
list-unitsoption is executed by default, which means that you will receive the same output when you omit this option. -
To list all unit files installed on your system and their status, type:
systemctl list-unit-files -
To view a list of all slices used on the system, type:
systemctl -t sliceUNIT LOAD ACTIVE SUB DESCRIPTION -.slice loaded active active Root Slice system-getty.slice loaded active active system-getty.slice system-modprobe.slice loaded active active system-modprobe.slice system.slice loaded active active System Slice user-1000.slice loaded active active User Slice of UID 1000 user.slice loaded active active User and Session Slice LOAD = Reflects whether the unit definition was properly loaded. ACTIVE = The high-level unit activation state, i.e. generalization of SUB. SUB = The low-level unit activation state, values depend on unit type. 6 loaded units listed. Pass --all to see loaded but inactive units, too. To show all installed unit files use 'systemctl list-unit-files'. -
To display detailed information about a service unit that corresponds to a system service, type:
systemctl status ssh.service● ssh.service - OpenBSD Secure Shell server Loaded: loaded (/lib/systemd/system/ssh.service; enabled; vendor preset: enabled) Active: active (running) since Tue 2021-11-23 15:07:53 CST; 49min ago Docs: man:sshd(8) man:sshd_config(5) Process: 350 ExecStartPre=/usr/sbin/sshd -t (code=exited, status=0/SUCCESS) Main PID: 367 (sshd) Tasks: 1 (limit: 4641) Memory: 8.0M CPU: 265ms CGroup: /system.slice/ssh.service └─367 sshd: /usr/sbin/sshd -D [listener] 0 of 10-100 startups -
To display the whole cgroup hierarchy on your system, type:
systemd-cglsWhen
systemd-cglsis issued without parameters, it returns the entire cgroup hierarchy.To view the information that stored in dedicated process files, type as root:
cat proc/PID/cgroupWhere
PIDstands for the ID of the process you wish to examine.The systemd-cgls command provides a static snapshot of the cgroup hierarchy. To see a dynamic account of currently running cgroups ordered by their resource usage (CPU, Memory, and IO), use:
systemd-cgtop
1.4. libcgroup
| The libcgroup package, which was the main tool for cgroup management in previous versions of Red Hat Enterprise Linux, is now deprecated. |
In order to use libcgroup tools, first ensure the cgroup-tools packages are installed on your system.
sudo apt-get install cgroup-tools -y
# sudo yum install libcgroup-tools -y
The cgroup-tools with version 0.41-21.el7 does not work with Cgroup v2.
$ sudo yum --showduplicates list libcgroup-tools
libcgroup-tools.x86_64                                             0.41-21.el7                                              @base
The cgroup version depends on the Linux distribution being used and the default cgroup version configured on the OS. To check which cgroup version your distribution uses, run the stat -fc %T /sys/fs/cgroup/ command on the node: [6]
stat -fc %T /sys/fs/cgroup/
# For cgroup v2, the output is cgroup2fs.
# For cgroup v1, the output is tmpfs.-
Finding a Process
To find the cgroup to which a process belongs, run:
ps -O cgroup$ ps -o pid,cgroup:60,command PID CGROUP COMMAND 5345 10:memory:/user.slice/user-1001.slice/session-21.scope,9:dev -bash 5441 10:memory:/user.slice/user-1001.slice/session-21.scope,9:dev ps -o pid,cgroup:60,commandOr, if you know the PID for the process, run:
cat /proc/PID/cgroupwhere
PIDstands for a ID of the inspected process.$ cat /proc/5345/cgroup 11:cpuset:/ 10:memory:/user.slice/user-1001.slice/session-21.scope 9:devices:/user.slice 8:perf_event:/ 7:blkio:/user.slice 6:rdma:/ 5:pids:/user.slice/user-1001.slice/session-21.scope 4:freezer:/ 3:net_cls,net_prio:/ 2:cpu,cpuacct:/user.slice 1:name=systemd:/user.slice/user-1001.slice/session-21.scope 0::/user.slice/user-1001.slice/session-21.scope -
Listing Controllers
To find the controllers that are available in your kernel and information on how they are mounted together to hierarchies, execute:
cat /proc/cgroups#subsys_name hierarchy num_cgroups enabled cpuset 4 68 1 cpu 3 277 1 cpuacct 3 277 1 memory 6 277 1 devices 8 277 1 freezer 11 68 1 net_cls 10 68 1 blkio 5 277 1 perf_event 2 68 1 hugetlb 7 68 1 pids 9 277 1 net_prio 10 68 1Alternatively, to find the mount points of particular subsystems, execute the following command:
$ lssubsys -m [controllers]Here
controllersstands for a list of the subsystems seperated with space in which you are interested.$ lssubsys -m cpuset /sys/fs/cgroup/cpuset cpu,cpuacct /sys/fs/cgroup/cpu,cpuacct memory /sys/fs/cgroup/memory devices /sys/fs/cgroup/devices freezer /sys/fs/cgroup/freezer net_cls,net_prio /sys/fs/cgroup/net_cls,net_prio blkio /sys/fs/cgroup/blkio perf_event /sys/fs/cgroup/perf_event hugetlb /sys/fs/cgroup/hugetlb pids /sys/fs/cgroup/pids $ lssubsys -m cpu memory cpu,cpuacct /sys/fs/cgroup/cpu,cpuacct memory /sys/fs/cgroup/memory -
Finding Hierarchies
It is recommended that you mount hierarchies under the
/sys/fs/cgroup/directory. Assuming this is the case on your system, list or browse the contents of that directory to obtain a list of hierarchies. If the tree utility is installed on your system, run it to obtain an overview of all hierarchies and the cgroups within them:tree /sys/fs/cgroup$ tree -L 1 /sys/fs/cgroup/ /sys/fs/cgroup/ ├── blkio ├── cpu -> cpu,cpuacct ├── cpuacct -> cpu,cpuacct ├── cpu,cpuacct ├── cpuset ├── devices ├── freezer ├── hugetlb ├── memory ├── net_cls -> net_cls,net_prio ├── net_cls,net_prio ├── net_prio -> net_cls,net_prio ├── perf_event ├── pids └── systemd -
Finding Control Groups
To list the cgroups on a system, execute as root:
lscgroupTo restrict the output to a specific hierarchy, specify a controller and a path in the format
controller:path. For example:lscgroup cpuset:adminusersThe above command lists only subgroups of the
adminuserscgroup in the hierarchy to which thecpusetcontroller is attached. -
Displaying Parameters of Control Groups
To display the parameters of specific cgroups, run:
cgget -r parameter list_of_cgroupswhere
parameteris a pseudofile that contains values for a controller, andlist_of_cgroupsis a list of cgroups separated with spaces. For example:cgget -r cpuset.cpus -r memory.limit_in_bytes group1 group2displays the values of
cpuset.cpusandmemory.limit_in_bytesfor cgroupsgroup1andgroup2.If you do not know the names of the parameters themselves, use a command like:
cgget -g cpuset /
1.5. nsenter
The kernel allocates and restricts the resources for individual processes running on the Linux operating system. The namespaces within the kernel partition these resources. Namespaces allocate the resources to a process such that the process only sees those specific resources, widely-used in container runtimes to provide a layer of isolation among containers that run on the same host. [7]
Use Docker to create a container from the debian:bullseye image and install procps package inside the container, which provides top and ps commands.
$ docker run --rm -it --name namespace-demo -it debian:bullseye /bin/bash
root@5153317a7aa2:/# apt-get update && apt-get install procps  -y
...
root@5153317a7aa2:/# ps
    PID TTY          TIME CMD
      1 pts/0    00:00:00 bash
    481 pts/0    00:00:00 ps
In another terminal, use the docker inspect command to determine the process id associated with the new container.
$ docker inspect namespace-demo -f "{{.State.Pid}}"
415111
The process id is 415111.
Each process has a /proc/[pid]/ns/ subdirectory containing one entry for each namespace that supports being manipulated by setns.
Use the ls or lsns command to list the namespaces associated with a given process.
$ sudo ls -l /proc/415111/ns/
total 0
lrwxrwxrwx 1 root root 0 Nov 24 12:34 cgroup -> 'cgroup:[4026533307]'
lrwxrwxrwx 1 root root 0 Nov 24 12:34 ipc -> 'ipc:[4026533238]'
lrwxrwxrwx 1 root root 0 Nov 24 12:34 mnt -> 'mnt:[4026533236]'
lrwxrwxrwx 1 root root 0 Nov 24 12:34 net -> 'net:[4026533241]'
lrwxrwxrwx 1 root root 0 Nov 24 12:34 pid -> 'pid:[4026533239]'
lrwxrwxrwx 1 root root 0 Nov 24 12:34 pid_for_children -> 'pid:[4026533239]'
lrwxrwxrwx 1 root root 0 Nov 24 12:34 time -> 'time:[4026531834]'
lrwxrwxrwx 1 root root 0 Nov 24 12:34 time_for_children -> 'time:[4026531834]'
lrwxrwxrwx 1 root root 0 Nov 24 12:34 user -> 'user:[4026531837]'
lrwxrwxrwx 1 root root 0 Nov 24 12:34 uts -> 'uts:[4026533237]'

$ sudo lsns -p 415111
        NS TYPE   NPROCS    PID USER COMMAND
4026531834 time      208      1 root /sbin/init
4026531837 user      208      1 root /sbin/init
4026533236 mnt         1 415111 root /bin/bash
4026533237 uts         1 415111 root /bin/bash
4026533238 ipc         1 415111 root /bin/bash
4026533239 pid         1 415111 root /bin/bash
4026533241 net         1 415111 root /bin/bash
4026533307 cgroup      1 415111 root /bin/bash
The nsenter command expands to namespace enter. It accepts different options to only enter the specified namespace.
Let’s enter the network namespace (-n) to check the IP address and route table.
$ nsenter -t 415111 -n ip a s
nsenter: cannot open /proc/415111/ns/net: Permission denied

$ sudo nsenter -t 415111 -n ip a s
1: lo: <LOOPBACK,UP,LOWER_UP> mtu 65536 qdisc noqueue state UNKNOWN group default qlen 1000
    link/loopback 00:00:00:00:00:00 brd 00:00:00:00:00:00
    inet 127.0.0.1/8 scope host lo
       valid_lft forever preferred_lft forever
19: eth0@if20: <BROADCAST,MULTICAST,UP,LOWER_UP> mtu 1500 qdisc noqueue state UP group default
    link/ether 02:42:ac:11:00:02 brd ff:ff:ff:ff:ff:ff link-netnsid 0
    inet 172.17.0.2/16 brd 172.17.255.255 scope global eth0
       valid_lft forever preferred_lft forever
Here, -t is the target process id, and -n refers to the network namespace.
$ sudo nsenter -t 415111 -n ip route
default via 172.17.0.1 dev eth0
172.17.0.0/16 dev eth0 proto kernel scope link src 172.17.0.2
Next, enter the process namespace to check the process details.
$ sudo nsenter -t 415111 -p -r ps -ef
UID          PID    PPID  C STIME TTY          TIME CMD
root           1       0  0 04:00 pts/0    00:00:00 /bin/bash
root         489       0  0 04:44 ?        00:00:00 ps -ef
The -r option sets the root directory to the top-level directory within the namespace so that the commands run in the context of the namespace.
$ sudo nsenter -t 415111 -p -r top
Tasks:   2 total,   1 running,   1 sleeping,   0 stopped,   0 zombie
%Cpu(s):  7.1 us, 14.3 sy,  0.0 ni, 78.6 id,  0.0 wa,  0.0 hi,  0.0 si,  0.0 st
MiB Mem :   3900.2 total,    129.4 free,   2200.9 used,   1569.8 buff/cache
MiB Swap:      0.0 total,      0.0 free,      0.0 used.   1459.5 avail Mem

    PID USER      PR  NI    VIRT    RES    SHR S  %CPU  %MEM     TIME+ COMMAND
      1 root      20   0    4092   3492   2984 S   0.0   0.1   0:00.06 bash
    490 root      20   0    6936   3192   2708 R   0.0   0.1   0:00.01 top
The bash command, which executes during docker run, is the first process inside the namespace.
Enter the UTC namespace to check the hostname.
$ sudo nsenter -t 415111 -u hostname
5153317a7aa2
Modify the hostname within the namespace and verify the new name.
$ sudo nsenter -t 415111 -u hostname foo.bar.buzz

$ sudo nsenter -t 415111 -u hostname
foo.bar.buzz
Finally, enter all namespaces by using the -a option.
$ sudo nsenter -t 415111 -a lsns
        NS TYPE   NPROCS PID USER COMMAND
4026531834 time        2   1 root /bin/bash
4026531837 user        2   1 root /bin/bash
4026533236 mnt         2   1 root /bin/bash
4026533237 uts         2   1 root /bin/bash
4026533238 ipc         2   1 root /bin/bash
4026533239 pid         2   1 root /bin/bash
4026533241 net         2   1 root /bin/bash
4026533307 cgroup      2   1 root /bin/bash
1.6. free
free is a popular command used by system administrators on Unix/Linux platforms. It’s a powerful tool that gives insight into the memory usage in human-readable format.
The man page for this command states that free displays the total amount of free and used memory on the system, including physical and swap space, as well as the buffers and caches used by the kernel. The information is gathered by parsing /proc/meminfo.
$ docker version -f '{{.Server.Version}}'
24.0.7

$ docker info | grep Cgroup
 Cgroup Driver: systemd
 Cgroup Version: 2

$ docker run --rm -it busybox free
              total        used        free      shared  buff/cache   available
Mem:        3993764     2410712      190544        2224     1392508     1344364
Swap:             0           0           0

$ docker run --rm -it --memory 100m busybox free
              total        used        free      shared  buff/cache   available
Mem:        3993764     2421988      178952        2180     1392824     1333032
Swap:             0           0           0

$ docker run --rm -it --memory 100m busybox sh -c 'echo $(($(cat /sys/fs/cgroup/memory.max) / 1024 / 1024))'
100
$ docker version -f '{{.Server.Version}}'
24.0.7
$ docker info | grep Cgroup
Cgroup Driver: cgroupfs
Cgroup Version: 1
$ docker run --rm -d --memory 100m busybox sleep 10m
6e5f69c591d46a3701e383ce3469eb3b63f3dfb2608012177fe646b8469a3540
$ lscgroup | grep 6e5f69c591d46a3701e383ce3469eb3b63f3dfb2608012177fe646b8469a3540
pids:/docker/6e5f69c591d46a3701e383ce3469eb3b63f3dfb2608012177fe646b8469a3540
devices:/docker/6e5f69c591d46a3701e383ce3469eb3b63f3dfb2608012177fe646b8469a3540
cpu,cpuacct:/docker/6e5f69c591d46a3701e383ce3469eb3b63f3dfb2608012177fe646b8469a3540
memory:/docker/6e5f69c591d46a3701e383ce3469eb3b63f3dfb2608012177fe646b8469a3540
blkio:/docker/6e5f69c591d46a3701e383ce3469eb3b63f3dfb2608012177fe646b8469a3540
cpuset:/docker/6e5f69c591d46a3701e383ce3469eb3b63f3dfb2608012177fe646b8469a3540
freezer:/docker/6e5f69c591d46a3701e383ce3469eb3b63f3dfb2608012177fe646b8469a3540
net_cls,net_prio:/docker/6e5f69c591d46a3701e383ce3469eb3b63f3dfb2608012177fe646b8469a3540
hugetlb:/docker/6e5f69c591d46a3701e383ce3469eb3b63f3dfb2608012177fe646b8469a3540
perf_event:/docker/6e5f69c591d46a3701e383ce3469eb3b63f3dfb2608012177fe646b8469a3540
$ cgget -r memory.limit_in_bytes /docker/6e5f69c591d46a3701e383ce3469eb3b63f3dfb2608012177fe646b8469a3540
/docker/6e5f69c591d46a3701e383ce3469eb3b63f3dfb2608012177fe646b8469a3540:
memory.limit_in_bytes: 104857600
$ docker run --rm -it --memory 100m busybox cat /sys/fs/cgroup/memory/memory.limit_in_bytes
104857600$ sudo crictl ps
CONTAINER IMAGE CREATED STATE NAME ATTEMPT POD ID
7fe801499210a 1ec24650902b1 2 hours ago Running kube-swagger-ui 0 bee47f1dec5bc
$ lscgroup | grep 7fe801499210a
cpu,cpuacct:/kubepods.slice/kubepods-besteffort.slice/kubepods-besteffort-pod26d20484_ab3f_4f87_92a4_7842aab7170f.slice/docker-7fe801499210afdc6490ee78bff40f9017a843814f4867b39ba6976c626a80a6.scope
net_cls,net_prio:/kubepods.slice/kubepods-besteffort.slice/kubepods-besteffort-pod26d20484_ab3f_4f87_92a4_7842aab7170f.slice/docker-7fe801499210afdc6490ee78bff40f9017a843814f4867b39ba6976c626a80a6.scope
freezer:/kubepods.slice/kubepods-besteffort.slice/kubepods-besteffort-pod26d20484_ab3f_4f87_92a4_7842aab7170f.slice/docker-7fe801499210afdc6490ee78bff40f9017a843814f4867b39ba6976c626a80a6.scope
pids:/kubepods.slice/kubepods-besteffort.slice/kubepods-besteffort-pod26d20484_ab3f_4f87_92a4_7842aab7170f.slice/docker-7fe801499210afdc6490ee78bff40f9017a843814f4867b39ba6976c626a80a6.scope
blkio:/kubepods.slice/kubepods-besteffort.slice/kubepods-besteffort-pod26d20484_ab3f_4f87_92a4_7842aab7170f.slice/docker-7fe801499210afdc6490ee78bff40f9017a843814f4867b39ba6976c626a80a6.scope
perf_event:/kubepods.slice/kubepods-besteffort.slice/kubepods-besteffort-pod26d20484_ab3f_4f87_92a4_7842aab7170f.slice/docker-7fe801499210afdc6490ee78bff40f9017a843814f4867b39ba6976c626a80a6.scope
devices:/kubepods.slice/kubepods-besteffort.slice/kubepods-besteffort-pod26d20484_ab3f_4f87_92a4_7842aab7170f.slice/docker-7fe801499210afdc6490ee78bff40f9017a843814f4867b39ba6976c626a80a6.scope
memory:/kubepods.slice/kubepods-besteffort.slice/kubepods-besteffort-pod26d20484_ab3f_4f87_92a4_7842aab7170f.slice/docker-7fe801499210afdc6490ee78bff40f9017a843814f4867b39ba6976c626a80a6.scope
cpuset:/kubepods.slice/kubepods-besteffort.slice/kubepods-besteffort-pod26d20484_ab3f_4f87_92a4_7842aab7170f.slice/docker-7fe801499210afdc6490ee78bff40f9017a843814f4867b39ba6976c626a80a6.scope2. What are Containers?
Containers are lightweight packages of your application code together with dependencies such as specific versions of programming language runtimes and libraries required to run your software services. [8][9]
Containers make it easy to share CPU, memory, storage, and network resources at the operating systems level and offer a logical packaging mechanism in which applications can be abstracted from the environment in which they actually run.
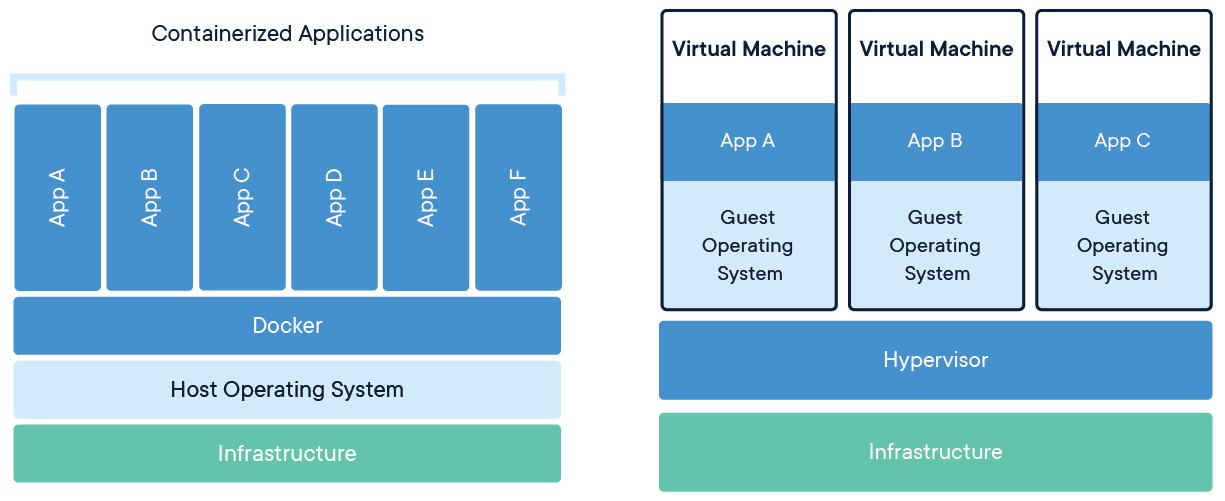
2.1. Containers vs. VMs
You might already be familiar with VMs: a guest operating system such as Linux or Windows runs on top of a host operating system with access to the underlying hardware. Containers are often compared to virtual machines (VMs). Like virtual machines, containers allow you to package your application together with libraries and other dependencies, providing isolated environments for running your software services.
-
Containers are much more lightweight than VMs
-
Containers virtualize at the OS level while VMs virtualize at the hardware level
-
Containers share the OS kernel and use a fraction of the memory VMs require

2.2. Open Container Initiative
The Open Container Initiative (OCI) is an open governance structure for the express purpose of creating open industry standards around container formats and runtimes.
Established in June 2015 by Docker and other leaders in the container industry, the OCI currently contains three specifications: the Runtime Specification (runtime-spec), the Image Specification (image-spec) and the Distribution Specification (distribution-spec).
Docker is donating its container format and runtime, runC, to the OCI to serve as the cornerstone of this new effort. [10]
-
runc
runcis a CLI tool for spawning and running containers on Linux according to the OCI specification. -
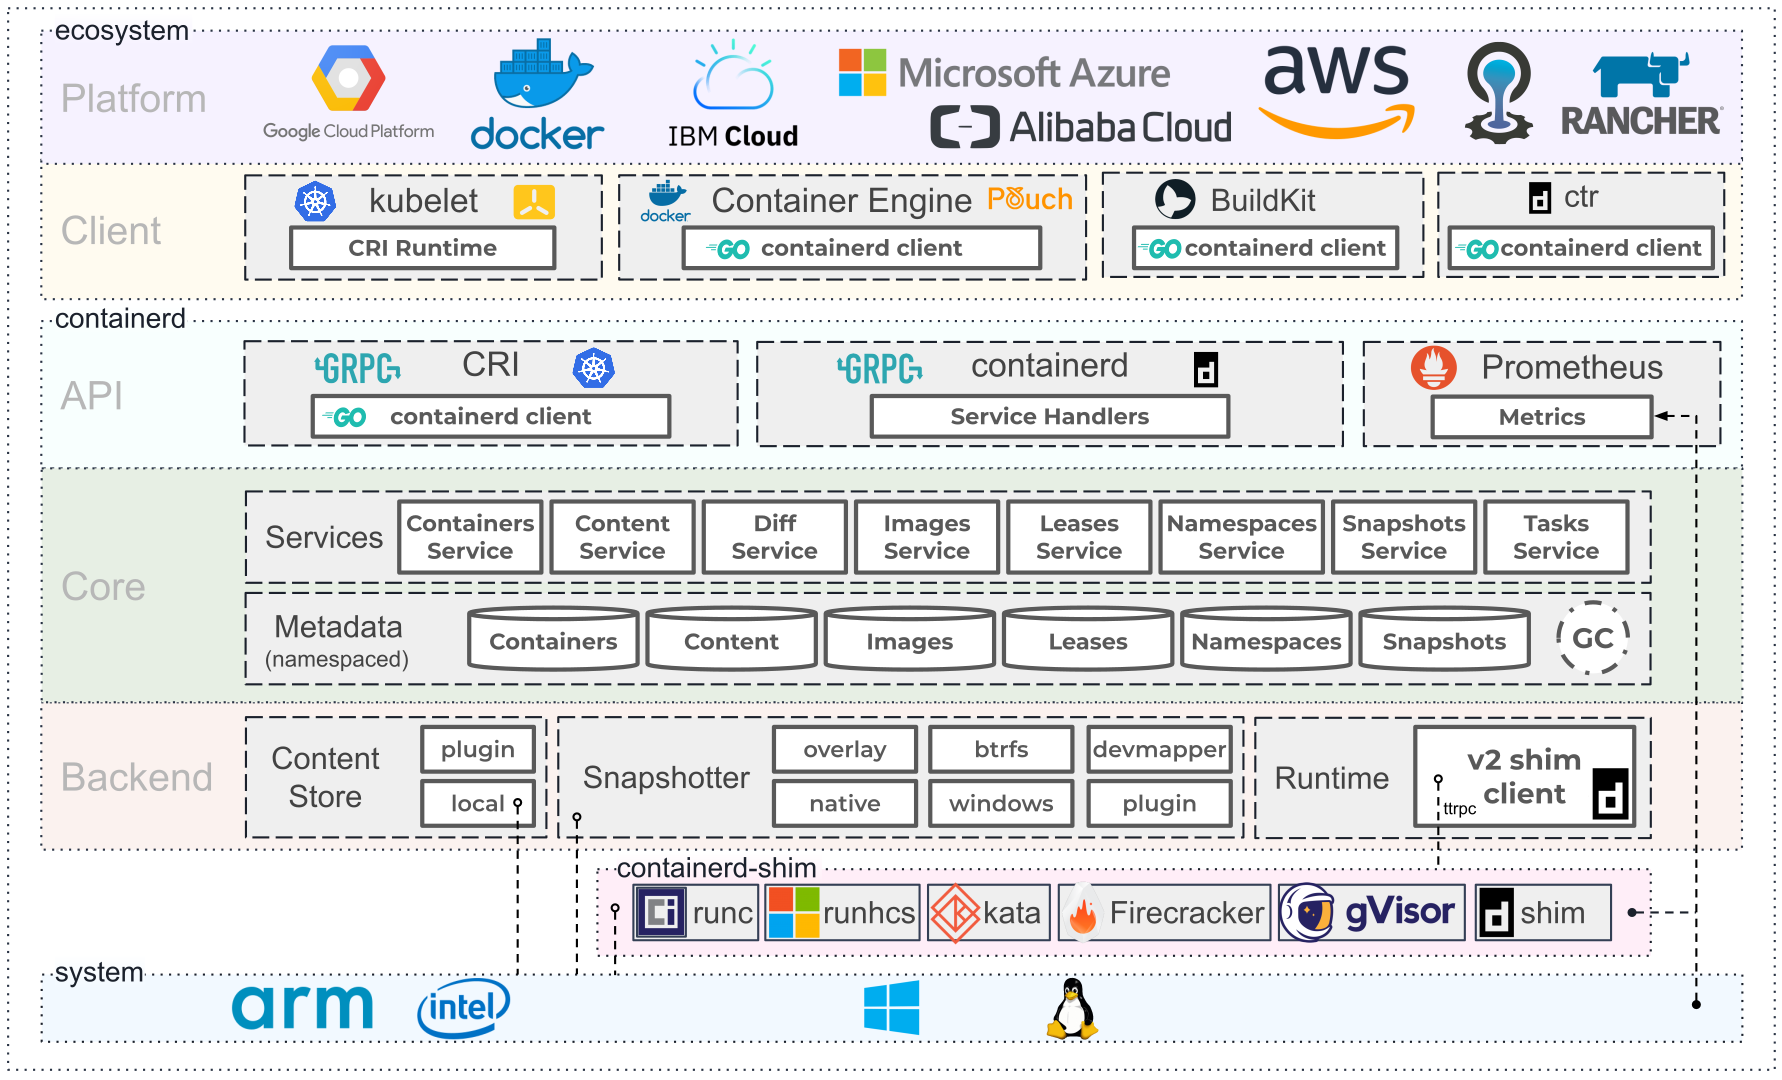
containerd
containerd is available as a daemon for Linux and Windows. It manages the complete container lifecycle of its host system, from image transfer and storage to container execution and supervision to low-level storage to network attachments and beyond.
Containerd is built on top of the Open Container Initiative’s runC and specification. Containerd is a daemon providing a GRPC API to manage containers on the local system. Containerd leverages runC to provide advanced functionality like checkpoint and restore, seccomp, and user namespace support which will open the door for these features into Docker. [11]
Containerd is designed to be embedded into a larger system, rather than being used directly by developers or end-users.
Containerd was designed to be used by Docker and Kubernetes as well as any other container platform that wants to abstract away syscalls or OS specific functionality to run containers on linux, windows, solaris, or other OSes. [12]
2.3. What is Docker?
The word "Docker" refers to several things, including an open source community project; tools from the open source project; Docker Inc., the company that primarily supports that project; and the tools that company formally supports. [13]
With Docker, you can treat containers like extremely lightweight, modular virtual machines. [14]
The Docker technology uses the Linux kernel and features of the kernel, like Cgroups and namespaces, to segregate processes so they can run independently. This independence is the intention of containers—the ability to run multiple processes and apps separately from one another to make better use of your infrastructure while retaining the security you would have with separate systems.
2.4. What is Kubernetes?
Kubernetes (also known as k8s or “kube”) is an open source container orchestration platform that automates many of the manual processes involved in deploying, managing, and scaling containerized applications. [15]

With Kubernetes you can:
-
Orchestrate containers across multiple hosts.
-
Make better use of hardware to maximize resources needed to run your enterprise apps.
-
Control and automate application deployments and updates.
-
Mount and add storage to run stateful apps.
-
Scale containerized applications and their resources on the fly.
-
Declaratively manage services, which guarantees the deployed applications are always running the way you intended them to run.
-
Health-check and self-heal your apps with autoplacement, autorestart, autoreplication, and autoscaling.
2.4.1. Container Runtime Interface (CRI)
At the lowest layers of a Kubernetes node is the software that, among other things, starts and stops containers. [16]
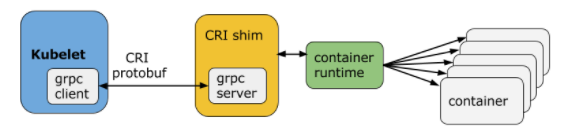
CRI (Container Runtime Interface) consists of a specifications/requirements (to-be-added), protobuf API, and libraries for container runtimes to integrate with kubelet on a node.
Kubelet communicates with the container runtime (or a CRI shim for the runtime) over Unix sockets using the gRPC framework, where kubelet acts as a client and the CRI shim as the server.
Kubernetes supports several container runtimes: Docker, containerd, CRI-O, and any implementation of the Kubernetes CRI (Container Runtime Interface).
2.4.2. What is dockershim
Just as Kubernetes started out with built-in support for Docker Engine, it also included built-in support for various storage volume solutions, network solutions, and even cloud providers. But maintaining these things on an ongoing basis became too cumbersome, so the community decided to strip all third party solutions out of the core, creating the relevant interfaces, such as: [17]
-
Container Runtime Interface (CRI)
-
Container Network Interface (CNI)
-
Container Storage Interface (CSI)
The idea was that any vendor could create a product that automatically interfaces with Kubernetes, as long as it is compliant with these interfaces.
That doesn’t mean that non-compliant components can’t be used with Kubernetes; Kubernetes can do anything with the right components. It just means that non-compliant components need a “shim”, which translates between the component and the relevant Kubernetes interface. For example, dockershim takes CRI commands and translates them into something Docker Engine understands, and vice versa. But with the drive to take third-party components like this out of the Kubernetes core, dockershim had to be removed.
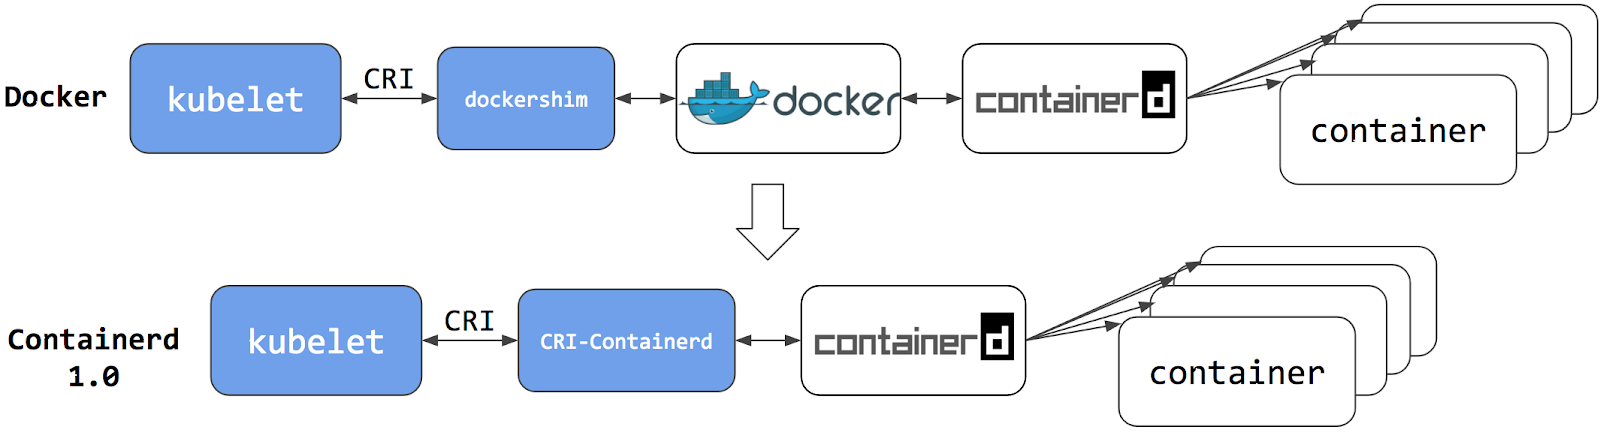
The Kubernetes project plans to deprecate Docker Engine support in the kubelet and support for dockershim will be removed in a future release announced as a part of the Kubernetes v1.20 release.
-
https://kubernetes.io/docs/tasks/administer-cluster/migrating-from-dockershim/
-
https://kubernetes.io/blog/2021/11/12/are-you-ready-for-dockershim-removal/
-
https://kubernetes.io/blog/2020/12/02/dont-panic-kubernetes-and-docker/
-
https://github.com/kubernetes/kubernetes/blob/master/CHANGELOG/CHANGELOG-1.20.md#deprecation
-
https://www.mirantis.com/blog/mirantis-to-take-over-support-of-kubernetes-dockershim-2/
2.4.3. Debugging Kubernetes nodes with crictl
crictl is a command-line interface for CRI-compatible container runtimes. You can use it to inspect and debug container runtimes and applications on a Kubernetes node. crictl and its source are hosted in the cri-tools repository. [18]
crictl connects to unix:///var/run/dockershim.sock by default. For other runtimes, you can set the endpoint in multiple different ways:
-
By setting flags
--runtime-endpointand--image-endpoint -
By setting environment variables
CONTAINER_RUNTIME_ENDPOINTandIMAGE_SERVICE_ENDPOINT -
By setting the endpoint in the config file
--config=/etc/crictl.yaml
You can also specify timeout values when connecting to the server and enable or disable debugging, by specifying timeout or debug values in the configuration file or using the --timeout and --debug command-line flags.
To view or edit the current configuration, view or edit the contents of /etc/crictl.yaml.
runtime-endpoint: unix:///var/run/dockershim.sock
image-endpoint: unix:///var/run/dockershim.sock
timeout: 10
debug: true
If you use crictl to create pod sandboxes or containers on a running Kubernetes cluster, the Kubelet will eventually delete them. crictl is not a general purpose workflow tool, but a tool that is useful for debugging.
|
-
List pods
$ sudo crictl pods POD ID CREATED STATE NAME NAMESPACE ATTEMPT RUNTIME 1ebbed223d8d2 20 hours ago Ready echoserver-66dcc9bcc6-5hwd9 default 2 (default) d6f1ec09d33d0 20 hours ago Ready kube-swagger-ui-69b565bcb9-kzv4d default 3 (default) 8b8633b6940b7 20 hours ago Ready metrics-server-559f9dc594-mmkch kube-system 3 (default) b9c3ee6965fb8 20 hours ago Ready overprovisioning-5767847cf9-47zh2 default 3 (default) ... $ sudo crictl pods --name echoserver-66dcc9bcc6-5hwd9 POD ID CREATED STATE NAME NAMESPACE ATTEMPT RUNTIME 1ebbed223d8d2 20 hours ago Ready echoserver-66dcc9bcc6-5hwd9 default 2 (default) $ sudo crictl pods --label app=echoserver POD ID CREATED STATE NAME NAMESPACE ATTEMPT RUNTIME 1ebbed223d8d2 20 hours ago Ready echoserver-66dcc9bcc6-5hwd9 default 2 (default) -
List images
$ sudo crictl images IMAGE TAG IMAGE ID SIZE k8s.gcr.io/coredns/coredns v1.8.4 8d147537fb7d1 47.6MB k8s.gcr.io/echoserver 1.4 a90209bb39e3d 140MB k8s.gcr.io/etcd 3.5.0-0 0048118155842 295MB k8s.gcr.io/kube-apiserver v1.22.3 53224b502ea4d 128MB ... $ sudo crictl images k8s.gcr.io/kube-apiserver IMAGE TAG IMAGE ID SIZE k8s.gcr.io/kube-apiserver v1.16.10 d925057c2fa51 170MB k8s.gcr.io/kube-apiserver v1.18.3 7e28efa976bd1 173MB k8s.gcr.io/kube-apiserver v1.22.3 53224b502ea4d 128MB -
List containers
$ sudo crictl ps CONTAINER IMAGE CREATED STATE NAME ATTEMPT POD ID 36720d10e6ac8 8522d622299ca 3 hours ago Running kube-flannel 0 e33d2645a22ab a93b979cf6c5a 6120bd723dced 3 hours ago Running kube-proxy 0 affa1ca7f0a2b -
Execute a command in a running container
$ sudo crictl exec -i -t a93b979cf6c5a ls bin dev home lib64 mnt proc run srv tmp var boot etc lib media opt root sbin sys usr -
Get a container’s logs
$ sudo crictl logs --tail 10 36720d10e6ac8 I1124 03:53:12.446713 1 iptables.go:172] Deleting iptables rule: ! -s 10.244.0.0/16 -d 10.244.0.0/16 -j MASQUERADE --random-fully I1124 03:53:12.447346 1 iptables.go:160] Adding iptables rule: -s 10.244.0.0/16 -d 10.244.0.0/16 -j RETURN I1124 03:53:12.448650 1 iptables.go:160] Adding iptables rule: -s 10.244.0.0/16 ! -d 224.0.0.0/4 -j MASQUERADE --random-fully I1124 03:53:12.449900 1 iptables.go:160] Adding iptables rule: ! -s 10.244.0.0/16 -d 10.244.1.0/24 -j RETURN I1124 03:53:12.451037 1 iptables.go:160] Adding iptables rule: ! -s 10.244.0.0/16 -d 10.244.0.0/16 -j MASQUERADE --random-fully I1124 03:53:12.543281 1 iptables.go:148] Some iptables rules are missing; deleting and recreating rules I1124 03:53:12.543375 1 iptables.go:172] Deleting iptables rule: -s 10.244.0.0/16 -j ACCEPT I1124 03:53:12.544132 1 iptables.go:172] Deleting iptables rule: -d 10.244.0.0/16 -j ACCEPT I1124 03:53:12.544818 1 iptables.go:160] Adding iptables rule: -s 10.244.0.0/16 -j ACCEPT I1124 03:53:12.546086 1 iptables.go:160] Adding iptables rule: -d 10.244.0.0/16 -j ACCEPT -
Run a pod sandbox
Using
crictlto run a pod sandbox is useful for debugging container runtimes. On a running Kubernetes cluster, the sandbox will eventually be stopped and deleted by the Kubelet.-
Create a JSON file like the following:
pod-config.json{ "metadata": { "name": "nginx-sandbox", "namespace": "default", "attempt": 1, "uid": "hdishd83djaidwnduwk28bcsb" }, "log_directory": "/tmp", "linux": { } } -
Use the
crictl runpcommand to apply the JSON and run the sandbox.$ sudo crictl runp pod-config.json 7a42c484476cd008df5730df0cbbd679c72ac57b7d16b82d40917ed5ffe20adaThe ID of the sandbox is returned.
-
-
Create a container
-
Pull a busybox image
$ sudo crictl pull busybox Image is up to date for busybox@sha256:e7157b6d7ebbe2cce5eaa8cfe8aa4fa82d173999b9f90a9ec42e57323546c353 -
Create configs for the pod and the container:
pod-config.json{ "metadata": { "name": "nginx-sandbox", "namespace": "default", "attempt": 1, "uid": "hdishd83djaidwnduwk28bcsb" }, "log_directory": "/tmp", "linux": { } }container-config.json{ "metadata": { "name": "busybox" }, "image":{ "image": "busybox" }, "command": [ "top" ], "log_path":"busybox.log", "linux": { } } -
Create the container, passing the ID of the previously-created pod, the container config file, and the pod config file. The ID of the container is returned.
$ sudo crictl create 7a42c484476cd008df5730df0cbbd679c72ac57b7d16b82d40917ed5ffe20ada container-config.json pod-config.json
1c0bbf7dce7207af100541032c273f0426b1a0d7f44fb00c263b185ee388dc88
You should set the CLI argument container-config.jsonbeforepod-config.json.
-
-
Start a container
To start a container, pass its ID to
crictl start:$ sudo crictl start 1c0bbf7dce7207af100541032c273f0426b1a0d7f44fb00c263b185ee388dc88 1c0bbf7dce7207af100541032c273f0426b1a0d7f44fb00c263b185ee388dc88 -
Create and start a container within one command
$ sudo crictl run container-config.json pod-config.json
7dc686635ed282a71b4b46210fc061847ea19f001e10f5860c335aa4375c713e

$ sudo crictl ps -a
CONTAINER           IMAGE               CREATED             STATE               NAME                      ATTEMPT             POD ID
7dc686635ed28       busybox             20 seconds ago      Exited              busybox                   0                   32623026e0ec8
References
-
[1] https://access.redhat.com/documentation/en-us/red_hat_enterprise_linux/7/html/kernel_administration_guide/kernel_features
-
[3] https://access.redhat.com/documentation/en-us/red_hat_enterprise_linux/7/html/resource_management_guide/index
-
[4] https://access.redhat.com/documentation/en-us/red_hat_enterprise_linux/7/html/system_administrators_guide/chap-managing_services_with_systemd
-
[5] https://access.redhat.com/documentation/en-us/red_hat_enterprise_linux/6/html/resource_management_guide/index
-
[6] https://kubernetes.io/docs/concepts/architecture/cgroups/
-
[7] https://www.redhat.com/sysadmin/container-namespaces-nsenter
-
[9] https://www.redhat.com/en/topics/containers/whats-a-linux-container
-
[11] https://www.docker.com/blog/containerd-daemon-to-control-runc/
-
[12] https://www.docker.com/blog/what-is-containerd-runtime/
-
[13] https://www.redhat.com/en/topics/containers/what-is-docker
-
[15] https://www.redhat.com/en/topics/containers/what-is-kubernetes
-
[16] https://kubernetes.io/blog/2016/12/container-runtime-interface-cri-in-kubernetes/
-
[17] https://www.mirantis.com/blog/mirantis-to-take-over-support-of-kubernetes-dockershim-2/
-
[18] https://kubernetes.io/docs/tasks/debug-application-cluster/crictl/
-
[19] https://www.suse.com/c/demystifying-containers-part-i-kernel-space/