Install a Kafka cluster in KRaft mode
Apache Kafka Raft (KRaft, pronounced craft) is the consensus protocol that was introduced in KIP-500 to remove Apache Kafka’s dependency on ZooKeeper for metadata management.
KRaft mode makes use of a new quorum controller service in Kafka which replaces the previous controller and makes use of an event-based variant of the Raft consensus protocol. [1]
KRaft mode is production ready for new clusters as of Apache Kafka 3.3. The development progress for additional features like migration from ZooKeeper is tracked in KIP-833.
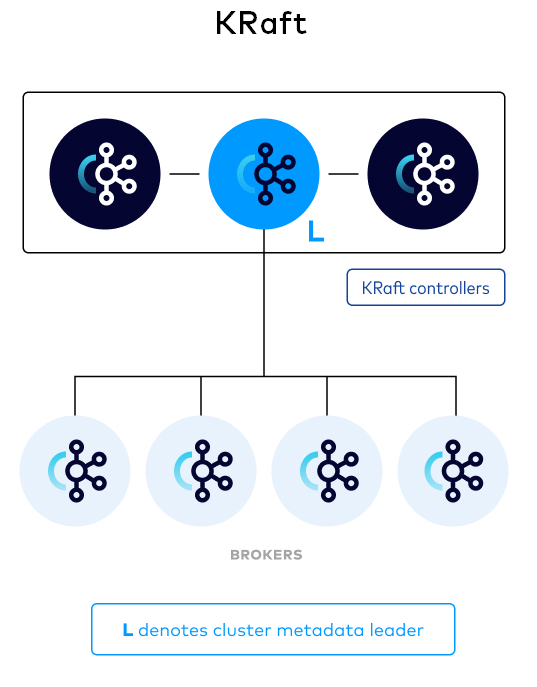
The KRaft controller nodes comprise a Raft quorum which manages the Kafka metadata log. This log contains information about each change to the cluster metadata. Everything that is currently stored in ZooKeeper, such as topics, partitions, ISRs, configurations, and so on, is stored in this log. [2]
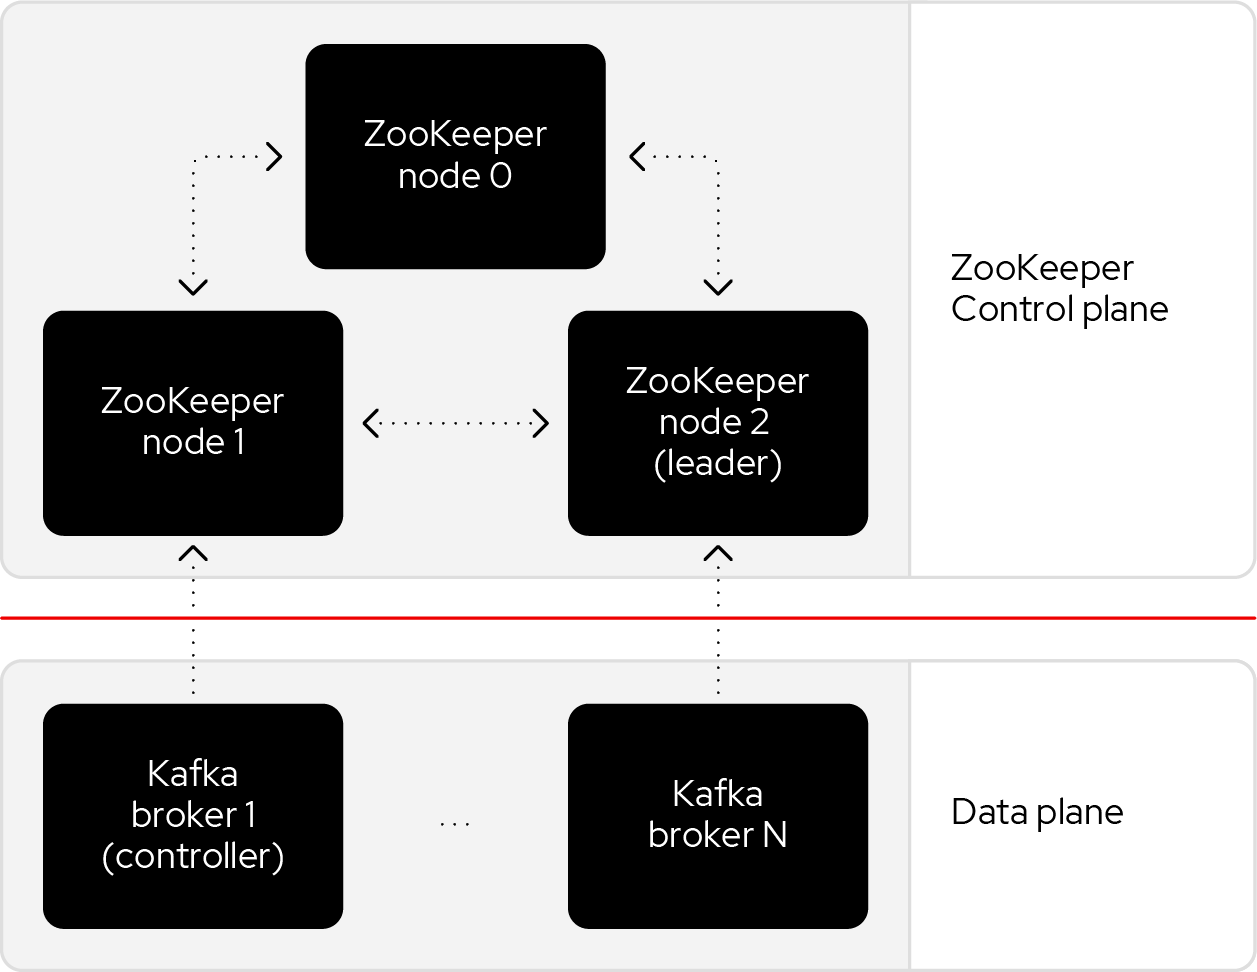
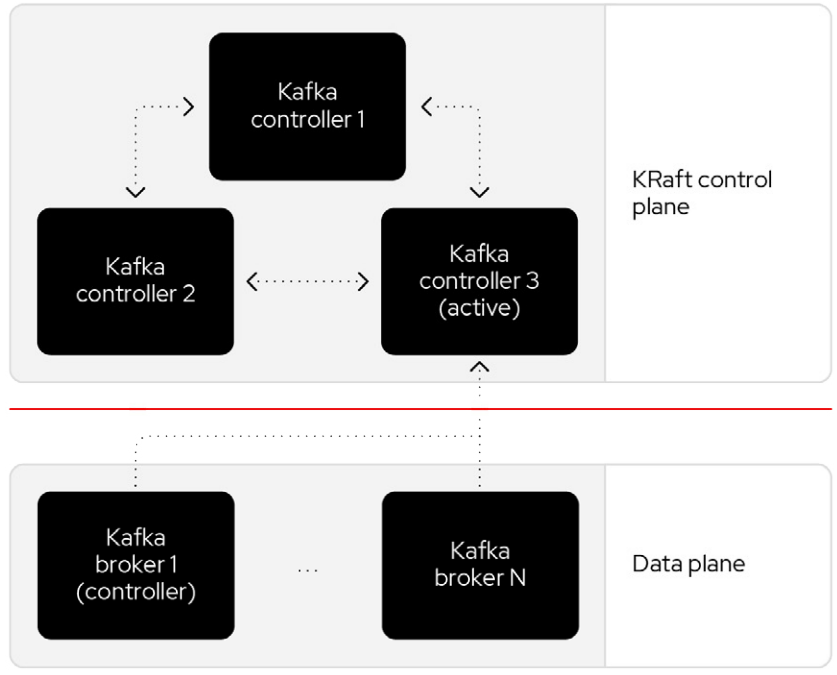
1. Control plane and Data plane
A Kafka cluster can be broken down into two components: a control plane and a data plane, each with its own responsibilities that work together to transfer data where it needs to go. [3]
Control plane responsibilities include:
-
Knowing which servers are alive.
-
Making appropriate changes when a server is detected as down.
-
Storing and exchanging metadata.
Data plane responsibilities include:
-
Handling requests to produce and fetch records and other application requests.
-
Reacting to metadata changes from the control plane.
Historically, Kafka used an Apache ZooKeeper cluster to provide most of its control plane functionality. ZooKeeper tracks each broker and provides replicated and consistent storage for the cluster metadata. ZooKeeper also elects one Kafka broker to be the controller. The controller has extra, non data plane duties to manage the state of the cluster, such as responding to brokers that crash or restart.
The new architecture removes the ZooKeeper dependency and replaces it with a flavor of the Raft consensus protocol, allowing each server in the Kafka cluster to take the role of broker, controller, or both. The controller cluster will perform the same roles as the cluster of ZooKeeper nodes did previously, but the Kafka controller will now be elected from the controllers instead of the brokers.
For a Kafka cluster to be highly available, you need to make certain both the data plane and control plane (whichever kind is being used) are highly available.
2. Install using TAR Archives
|
Your local environment must have Java 8+ installed.
|
2.1. Setup a standalone server in KRaft combined mode as a proof of concept.
-
Go to https://kafka.apache.org/, download the latest Kafka:
$ curl -LO https://dlcdn.apache.org/kafka/3.6.1/kafka_2.13-3.6.1.tgz -
Create a
kafkauser and extract the tar to the home:$ sudo useradd -m kafka # [-s /bin/bash] Specify the login shell of the new account. $ sudo su - kafka $ sudo tar xf kafka_2.13-3.6.1.tgz -C /home/kafka/ --strip-components=1Running Kafka as root is not a recommended configuration. -
Generate a Cluster UUID:
$ KAFKA_CLUSTER_ID="$(bin/kafka-storage.sh random-uuid)" -
Format Log Directories:
$ bin/kafka-storage.sh format -t $KAFKA_CLUSTER_ID -c config/kraft/server.properties Formatting /tmp/kraft-combined-logs with metadata.version 3.6-IV2. -
Start the Kafka Server:
$ bin/kafka-server-start.sh config/kraft/server.properties
...
[2024-01-12 23:22:34,872] INFO [SocketServer listenerType=CONTROLLER, nodeId=1] Enabling request processing. (kafka.network.SocketServer)
[2024-01-12 23:22:34,881] INFO [MetadataLoader id=1] InitializeNewPublishers: initializing ScramPublisher controller id=1 with a snapshot at offset 4 (org.apache.kafka.image.loader.MetadataLoader)
[2024-01-12 23:22:34,911] INFO Awaiting socket connections on 0.0.0.0:9093. (kafka.network.DataPlaneAcceptor)
...
[2024-01-12 23:22:36,629] INFO [SocketServer listenerType=BROKER, nodeId=1] Enabling request processing. (kafka.network.SocketServer)
[2024-01-12 23:22:36,629] INFO Awaiting socket connections on 0.0.0.0:9092. (kafka.network.DataPlaneAcceptor)
...
The logs (not to be confused with the commit log) are located at logswhich are configured in the log4j.properties. -
Once the Kafka server has successfully launched:
-
Open another terminal session and create a topic:
$ bin/kafka-topics.sh --create --topic quickstart-events --bootstrap-server localhost:9092 Created topic quickstart-events. $ bin/kafka-topics.sh --describe --topic quickstart-events --bootstrap-server localhost:9092 Topic: quickstart-events TopicId: wx6vplZjRHaJubPnPP3_QQ PartitionCount: 1 ReplicationFactor: 1 Configs: segment.bytes=1073741824 Topic: quickstart-events Partition: 0 Leader: 1 Replicas: 1 Isr: 1 -
Run the console producer client to write a few events into your topic:
$ bin/kafka-console-producer.sh --topic quickstart-events --bootstrap-server localhost:9092 This is my first event This is my second event -
Open another terminal session and run the console consumer client to read the events you just created:
$ bin/kafka-console-consumer.sh --topic quickstart-events --from-beginning --bootstrap-server localhost:9092
This is my first event
This is my second event
-
2.2. Setup a Kafka cluster in KRaft
-
Make sure the nodes in the cluster could be reachable each other:
You can use the hostname, DNS name, or even IP address to connect each other. You can run the ip a sto show the addresses assigned to all network interfaces.The following steps will be demostrated with the following two nodes (/etc/hosts):
192.168.46.131 node-1 192.168.46.132 node-2 -
Create a
kafkauser and extract the tar to the home at each node:$ sudo useradd -m kafka # [-s /bin/bash] Specify the login shell of the new account. $ sudo su - kafka $ sudo tar xf kafka_2.13-3.6.1.tgz -C /home/kafka/ --strip-components=1Running Kafka as root is not a recommended configuration. -
Generate a Cluster UUID:
$ KAFKA_CLUSTER_ID="$(bin/kafka-storage.sh random-uuid)"
$ echo $KAFKA_CLUSTER_ID
MkU3OEVBNTcwNTJENDM2Qk
Note down the value of
KAFKA_CLUSTER_IDand copy it to each node in/etc/profile.d/kafka.shwith the following content:KAFKA_CLUSTER_ID=MkU3OEVBNTcwNTJENDM2QkLoad the environment variables to the current shell with the following command:
$ source /etc/profile -
Backup the orignal config directory on each node:
$ cp -a config config.org -
Create log.dirs with the following commands on each node:
$ sudo mkdir -p /var/lib/kafka $ sudo chown kafka:kafka /var/lib/kafka -
Update the config/kraft/controller.properties:
# The node id associated with this instance's roles
# !!! on the second node, set the node.id to be 3002.
node.id=3001

# The connect string for the controller quorum
controller.quorum.voters=3001@node-1:9093,3002@node-2:9093

# Use to specify where the metadata log for clusters in KRaft mode is placed.
log.dirs=/var/lib/kafka/controller
Each node ID ( node.id) must be unique across all the servers in a particular cluster. -
Update the config/kraft/broker.properties:
# The node id associated with this instance's roles
# !!! on the second node, set the node.id to be 1002.
node.id=1001

# The connect string for the controller quorum
controller.quorum.voters=3001@node-1:9093,3002@node-2:9093

# The address the socket server listens on.
listeners=PLAINTEXT://:9092

# Listener name, hostname and port the broker will advertise to clients.
# !!! on the second node, set it to be `PLAINTEXT://node-2:9092`.
advertised.listeners=PLAINTEXT://node-1:9092

# The directory in which the log data is kept。
log.dirs=/var/lib/kafka/data
Each node ID ( node.id) must be unique across all the servers in a particular cluster.The advertised.listenersshould be reachable by the clients outside the cluster. You could set it with a reachable hostname or DNS name, or an external IP address. [7] -
Format Log Directories:
$ bin/kafka-storage.sh format -t $KAFKA_CLUSTER_ID -c config/kraft/controller.properties Formatting /var/lib/kafka/controller with metadata.version 3.6-IV2. $ bin/kafka-storage.sh format -t $KAFKA_CLUSTER_ID -c config/kraft/broker.properties Formatting /var/lib/kafka/data with metadata.version 3.6-IV2. -
Start the Kafka Controller and Broker on each node:
$ bin/kafka-server-start.sh -daemon config/kraft/controller.properties
$ bin/kafka-server-start.sh -daemon config/kraft/broker.properties
Note that authentication is disabled for JMX by default in Kafka and security configs must be overridden for production deployments by setting the environment variable
KAFKA_JMX_OPTSfor processes started using the CLI or by setting appropriate Java system properties. [5][6]$ JMX_PORT=9101 bin/kafka-server-start.sh -daemon config/kraft/broker.properties -
Use the
kafka-metadata-quorumtool to query the metadata quorum status.The following code example displays a summary of the metadata quorum:
$ bin/kafka-metadata-quorum.sh --bootstrap-server node-1:9092 describe --status
bin/kafka-metadata-quorum.sh --bootstrap-server node-1:9092 describe --status
ClusterId:              MkU3OEVBNTcwNTJENDM2Qg
LeaderId:               3002
LeaderEpoch:            83
HighWatermark:          779
MaxFollowerLag:         0
MaxFollowerLagTimeMs:   408
CurrentVoters:          [3001,3002]
CurrentObservers:       [1001,1002]
2.2.1. Setup Schema Registry
Schema Registry provides a centralized repository for managing and validating schemas for topic message data, and for serialization and deserialization of the data over the network. [8] [9]
The Schema Registry is not part of Apache Kafka but there are several open source options to choose from. Here we use the Confluent Schema Registry for this example. [10]
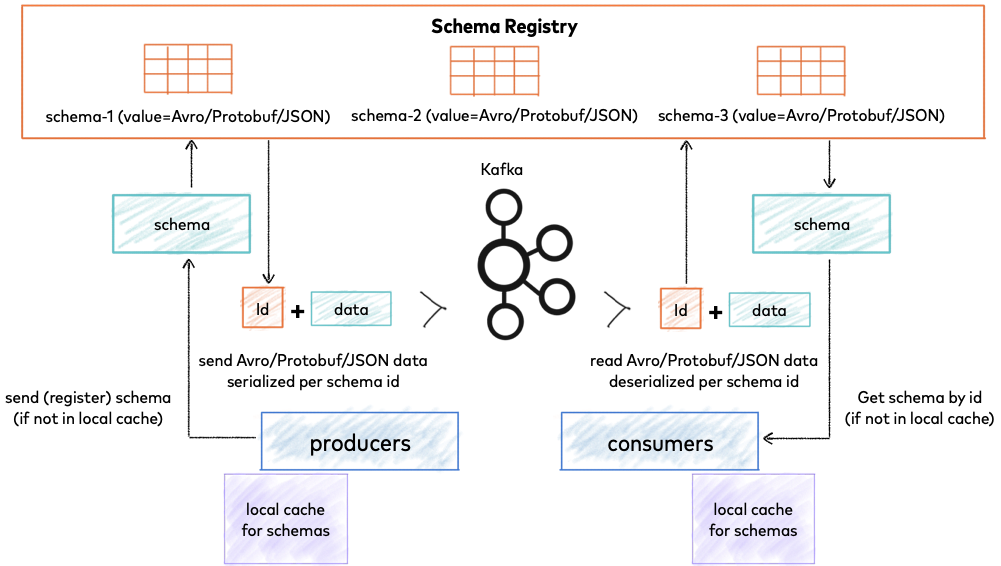
Schema Registry lives outside of and separately from your Kafka brokers. Your producers and consumers still talk to Kafka to publish and read data (messages) to topics. Concurrently, they can also talk to Schema Registry to send and retrieve schemas that describe the data models for the messages. [14]
Schema Registry is a distributed storage layer for schemas which uses Kafka as its underlying storage mechanism. Some key design decisions:
-
Assigns globally unique ID to each registered schema. Allocated IDs are guaranteed to be monotonically increasing and unique, but not necessarily consecutive.
-
Kafka provides the durable backend, and functions as a write-ahead changelog for the state of Schema Registry and the schemas it contains.
-
Schema Registry is designed to be distributed, with single-primary architecture, and ZooKeeper/Kafka coordinates primary election (based on the configuration).
2.2.1.1. Installation
-
Download Confluent Platform using only Confluent Community components by using the
curlcommand:$ curl -O https://packages.confluent.io/archive/7.5/confluent-community-7.5.3.tar.gz -
Extract the contents of the archive to /home/kafka/confluent:
$ mkdir /home/kafka/confluent $ tar xf confluent-community-7.5.3.tar.gz -C /home/kafka/confluent/ --strip-components=1 $ cd /home/kafka/confluent $ cp -a etc/ etc.org -
Navigate to the Schema Registry properties file (etc/schema-registry/schema-registry.properties) and specify or update the following properties:
# Specify the address the socket server listens on, e.g. listeners = PLAINTEXT://your.host.name:9092
listeners=http://0.0.0.0:8081

# The advertised host name. Make sure to set this if running Schema Registry with multiple nodes.
host.name=node-1

# List of Kafka brokers to connect to, e.g. PLAINTEXT://hostname:9092,SSL://hostname2:9092
kafkastore.bootstrap.servers=PLAINTEXT://node-1:9092,PLAINTEXT://node-1:9092
Schema Registry on Confluent Platform can be deployed using a single primary source, with either Kafka or ZooKeeper leader election. You can also set up multiple Schema Registry servers for high availability deployments, where you switch to a secondary Schema Registry cluster if the primary goes down, and for data migration, one time or as a continuous feed. [13]
-
Start Schema Registry. Run this command in its own terminal:
$ bin/schema-registry-start -daemon etc/schema-registry/schema-registry.properties -
View the runtime logs of Schema Registry:
$ tail -f logs/schema-registry.log [2024-01-13 01:58:05,916] INFO DefaultSessionIdManager workerName=node0 (org.eclipse.jetty.server.session) [2024-01-13 01:58:05,916] INFO No SessionScavenger set, using defaults (org.eclipse.jetty.server.session) [2024-01-13 01:58:05,918] INFO node0 Scavenging every 600000ms (org.eclipse.jetty.server.session) [2024-01-13 01:58:06,798] INFO HV000001: Hibernate Validator 6.1.7.Final (org.hibernate.validator.internal.util.Version) [2024-01-13 01:58:07,291] INFO Started o.e.j.s.ServletContextHandler@53a84ff4{/,null,AVAILABLE} (org.eclipse.jetty.server.handler.ContextHandler) [2024-01-13 01:58:07,319] INFO Started o.e.j.s.ServletContextHandler@5807efad{/ws,null,AVAILABLE} (org.eclipse.jetty.server.handler.ContextHandler) [2024-01-13 01:58:07,349] INFO Started NetworkTrafficServerConnector@65a15628{HTTP/1.1, (http/1.1, h2c)}{0.0.0.0:8081} (org.eclipse.jetty.server.AbstractConnector) [2024-01-13 01:58:07,354] INFO Started @9485ms (org.eclipse.jetty.server.Server) [2024-01-13 01:58:07,355] INFO Schema Registry version: 7.5.3 commitId: 03b675da443c5687684ecae6736d873560f7c441 (io.confluent.kafka.schemaregistry.rest.SchemaRegistryMain) [2024-01-13 01:58:07,356] INFO Server started, listening for requests... (io.confluent.kafka.schemaregistry.rest.SchemaRegistryMain) -
Show the
_schemasinformation:
$ bin/kafka-topics.sh --describe --topic _schemas --bootstrap-server node-1:9092
Topic: _schemas	TopicId: 9A_-36hMRYuTfUyhQwMm6Q	PartitionCount: 1	ReplicationFactor: 2	Configs: cleanup.policy=compact,segment.bytes=1073741824
	Topic: _schemas	Partition: 0	Leader: 1001	Replicas: 1001,1002	Isr: 1001,1002
2.2.2. Setup UI for Apache Kafka
UI for Apache Kafka is a free, open-source web UI to monitor and manage Apache Kafka clusters. [15]
$ docker run -it -p 8080:8080 -e DYNAMIC_CONFIG_ENABLED=true provectuslabs/kafka-ui3. Install using Docker
| Make sure the nodes in the cluster could be reachable each other. |
| You can use the hostname, DNS name, or an external IP address to connect each other. |
You can run the ip a s to show the addresses assigned to all network interfaces.
|
| The following steps will be demostrated with the following two nodes: |
192.168.56.131 node-1
192.168.56.132 node-2-
Optional: Install Docker Engine
See https://docs.docker.com/engine/install/ to install Docker Engine.
You might need to configure the Docker daemon to use a different data directory (by default: /var/lib/docker on Linux) and the log driver options.-
Create the configuration file at /etc/docker/daemon.json with the following content:
{ "data-root": "/mnt/docker-data", "log-opts": { "max-file": "5", "max-size": "10m" } } -
Restart Docker:
sudo systemctl start docker -
Show Docker version:
$ sudo docker --version
Docker version 24.0.7, build afdd53b
-
-
Optional: Stop and disable the firewalld.service.
-
View the current status:
sudo firewall-cmd --state -
Stop the FirewallD service:
sudo systemctl stop firewalld.service -
List the rules:
$ sudo iptables -L Chain INPUT (policy ACCEPT) target prot opt source destination Chain FORWARD (policy ACCEPT) target prot opt source destination Chain OUTPUT (policy ACCEPT) target prot opt source destination -
Disable the FirewallD service
sudo systemctl disable firewalld.service
-
-
Optional: Generate a Cluster UUID:
$ KAFKA_CLUSTER_ID="$(docker run --rm confluentinc/cp-kafka:7.5.3 kafka-storage random-uuid)" $ echo $KAFKA_CLUSTER_ID MkU3OEVBNTcwNTJENDM2Qg -
Copy the docker/ directory to all the nodes in the Kafka cluster:
-
Start the controllers:
On node-1:
-
Update the compose.override.yml in docker/controller/compose.override.yml:
version: "2.4"
services:
  controller:
    environment:
      KAFKA_NODE_ID: 3001
      KAFKA_CONTROLLER_QUORUM_VOTERS: '3001@node-1:9093,3002@node-2:9093'
      CLUSTER_ID: 'MkU3OEVBNTcwNTJENDM2Qg'
    extra_hosts:
      - "node-1:192.168.56.131"
      - "node-2:192.168.56.132"
Update the CLUSTER_IDwith theKAFKA_CLUSTER_IDthat generated at the above step.Each node ID ( KAFKA_NODE_ID) must be unique across all the nodes in a particular cluster. -
Start the Kraft controller:
cd docker/controller
docker compose up -d
On node-2:
-
Repeat the above steps and update the
KAFKA_NODE_IDwith3002.
-
-
Start the brokers:
On node-1:
-
Update the compose.override.yml in docker/broker/compose.override.yml:
version: "2.4"
services:
  controller:
    environment:
      KAFKA_NODE_ID: 1001
      KAFKA_ADVERTISED_LISTENERS: 'PLAINTEXT://node-1:9092'
      KAFKA_CONTROLLER_QUORUM_VOTERS: '3001@node-1:9093,3002@node-2:9093'
      CLUSTER_ID: 'MkU3OEVBNTcwNTJENDM2Qg'
    extra_hosts:
      - "node-1:192.168.56.131"
      - "node-2:192.168.56.132"
Update the CLUSTER_IDwith theKAFKA_CLUSTER_IDthat generated at step 2.Each node ID ( KAFKA_NODE_ID) must be unique across all the nodes in a particular cluster.The KAFKA_ADVERTISED_LISTENERSshould be reachable by the clients outside the cluster. You could set it with a reachable hostname or DNS name, or an external IP address. -
Start the broker:
cd docker/broker docker compose up -d -
Use
kcatto display the current state of the Kafka cluster and its topics, partitions, replicas and in-sync replicas (ISR).$ docker run --rm --add-host node-1:192.168.56.131 confluentinc/cp-kcat:7.5.3 -b node-1:9092 -L Metadata for all topics (from broker -1: node-1:9092/bootstrap): 1 brokers: broker 1001 at node-1:9092 (controller) 0 topics: -
Use the
kafka-metadata-quorumtool to view the metadata quorum status.$ docker run --rm --add-host node-1:192.168.56.131 confluentinc/cp-kafka:7.5.3 kafka-metadata-quorum --bootstrap-server node-1:9092 describe --status ClusterId: MkU3OEVBNTcwNTJENDM2Qg LeaderId: 3002 LeaderEpoch: 28 HighWatermark: 47816 MaxFollowerLag: 0 MaxFollowerLagTimeMs: 32 CurrentVoters: [3001,3002] CurrentObservers: [1001]On node-2:
-
Repeat the above steps and update the
KAFKA_NODE_IDwith1002, andKAFKA_ADVERTISED_LISTENERSwith'PLAINTEXT://node-2:9092'. -
Use
kcatto display the current state of the Kafka cluster and its topics, partitions, replicas and in-sync replicas (ISR).$ docker run --rm --add-host node-2:192.168.56.132 confluentinc/cp-kcat:7.5.3 -b node-2:9092 -L Metadata for all topics (from broker 1002: node-2:9092/1002): 2 brokers: broker 1001 at node-2:9092 broker 1002 at node-2:9092 (controller) 0 topics: -
Use the
kafka-metadata-quorumtool to view the metadata quorum status.$ docker run --rm --add-host node-2:192.168.56.132 confluentinc/cp-kafka:7.5.3 kafka-metadata-quorum --bootstrap-server node-2:9092 describe --status ClusterId: MkU3OEVBNTcwNTJENDM2Qg LeaderId: 3002 LeaderEpoch: 28 HighWatermark: 47816 MaxFollowerLag: 0 MaxFollowerLagTimeMs: 32 CurrentVoters: [3001,3002] CurrentObservers: [1001,1002]
-
-
Start the Schema Registry:
On node-1:
-
Update the compose.override.yml in docker/schema-registry/compose.override.yml:
version: "2.4" services: schema-registry: environment: SCHEMA_REGISTRY_HOST_NAME: node-1 SCHEMA_REGISTRY_KAFKASTORE_BOOTSTRAP_SERVERS: node-1:9092,node-2:9092 SCHEMA_REGISTRY_DEBUG: true extra_hosts: - "node-1:192.168.56.131" - "node-2:192.168.56.132" -
Start the Schema Registry:
cd docker/schema-registry:
docker compose up -d
On node-2:
-
Repeat the above steps, and replace the
SCHEMA_REGISTRY_HOST_NAMEwithnode-2to setup a replication if you need to support high available service.
-
-
Start the UI Kafka:
On node-1:
-
Update the compose.override.yml in docker/controller/compose.override.yml:
version: "2.4" services: kafka-ui: environment: KAFKA_CLUSTERS_0_NAME: iot KAFKA_CLUSTERS_0_BOOTSTRAPSERVERS: node-1:9092,node-2:9092 extra_hosts: - "node-1:192.168.56.131" - "node-2:192.168.56.132" -
Start the kafka-ui:
cd docker/kafka-ui docker compose up -d -
Go to http://node-1:8080 with your browser to view the cluster status.
On node-2:
-
Repeat the above steps to setup a replication of the kafka-ui if you need to support high available service.
-
Go to http://node-2:8080 with your browser to view the cluster status.
-
References
-
[2] https://docs.confluent.io/platform/current/kafka-metadata/kraft.html
-
[3] https://www.redhat.com/en/resources/high-availability-for-apache-kafka-detail
-
[6] https://access.redhat.com/documentation/en-us/red_hat_amq_streams/2.5/html/using_amq_streams_on_rhel/monitoring-str
-
[7] https://www.confluent.io/blog/kafka-listeners-explained/
-
[8] https://docs.confluent.io/platform/current/schema-registry/index.html
-
[9] https://www.conduktor.io/blog/what-is-the-schema-registry-and-why-do-you-need-to-use-it/
-
[10] "20170707-EB-Confluent_Kafka_Definitive-Guide_Complete", https://www.confluent.io/resources/kafka-the-definitive-guide/
-
[11] https://docs.confluent.io/platform/current/installation/installing_cp/zip-tar.html
-
[12] https://docs.confluent.io/platform/current/schema-registry/installation/deployment.html
-
[13] https://docs.confluent.io/platform/current/schema-registry/multidc.html
-
[14] https://docs.confluent.io/platform/current/schema-registry/fundamentals/index.html
-
[15] https://docs.kafka-ui.provectus.io/overview/getting-started
-
[16] https://docs.confluent.io/platform/current/schema-registry/fundamentals/serdes-develop/index.html
-
[19] https://docs.confluent.io/platform/current/installation/docker/installation.html